Install the app
How to install the app on iOS
Follow along with the video below to see how to install our site as a web app on your home screen.
Note: This feature may not be available in some browsers.

You are using an out of date browser. It may not display this or other websites correctly.
You should upgrade or use an alternative browser.
You should upgrade or use an alternative browser.
2009 Dragon 8 163" has arrived
- Thread starter Ron
- Start date


Tip it on it's side and see if the track rolls freely. Would be very curious to know. Thanks!!!
R
Ron
ACCOUNT CLOSED
Tip it on it's side and see if the track rolls freely. Would be very curious to know. Thanks!!!
Sorry but a properly tensioned track will not roll freely out of the snow- without a rider. There is no rolling restistance once the rider is on the sled, in the snow....PERIOD. I don't need to test the track I had an identical 08, ran the track tight & had a very fast sled, no hyfax wear, no ice balls, etc. etc. This loose track myth has a life of it's own.
Don't have any axe to grind but some innocent bystanders are getting confused.
Removal of all idler wheels makes lubrication marginal in some snow conditions, even with the ice scratchers down. Don't confuse cold low moisture snow with the track tension. This means that on some cold mornings in low moisture snow you can't run down the trail at 70MPH without a hyfax issue. It's a trade off for less weight & some may want to put bogey wheels back on their sled. I've been running without bogeys for years but I leave them on my wifes sled. But I need my ice scratchers way more often.
Last edited:
I 2nd Ron's track tension info. There have been numerous tests that show a loose tracks creates excessive waves/wabble/ripples or whatever you want to call it, causing more resistance than a tight track does. I used to believe the loose track BS. Now bigger wheels = less of an angle is another story, that will aid the rolling resistance or whatever you wanna call it, for lack of a better term, a little. I am no expert but have spoken with several of them about this very thing. So for what it's worth, I run a fairly tight track, bout 2 fingers give or take.
P.S. Holz install on the 13th.......He!! yeah!
I thought the Float 2's had clicker adjustments but apparently not??????????
P.S. Holz install on the 13th.......He!! yeah!
I thought the Float 2's had clicker adjustments but apparently not??????????
Last edited:
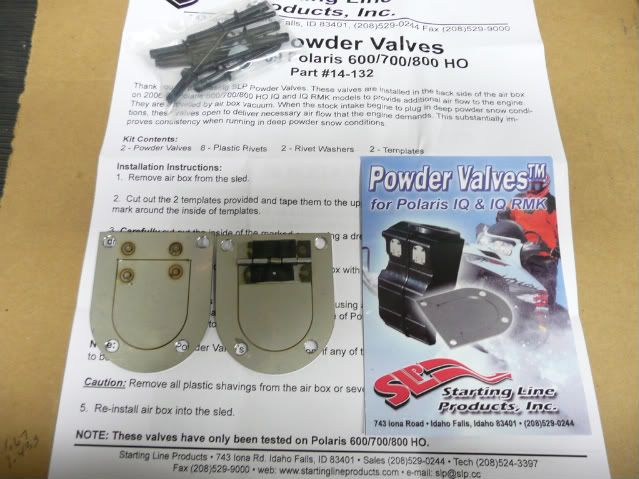
SLP has shipped the new Powder Valves, just got mine today. They are spendy about $50 a pair. Serve as a backup source of air should your intakes plug up with powder.
lol, my order was held up waiting for slp to get those..mine shipped yesterday..
R
Ron
ACCOUNT CLOSED
Boards installed
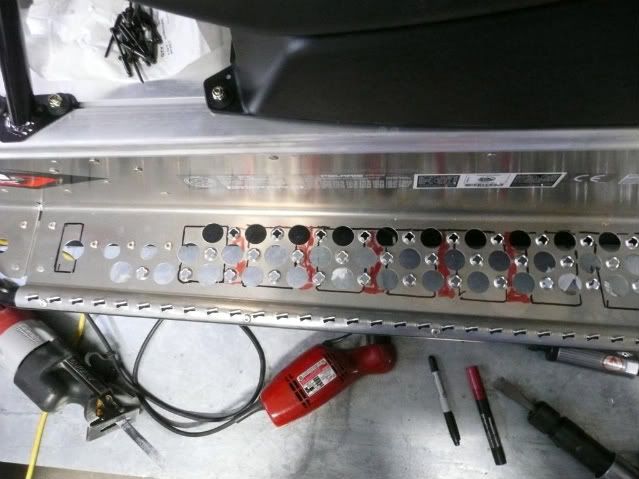
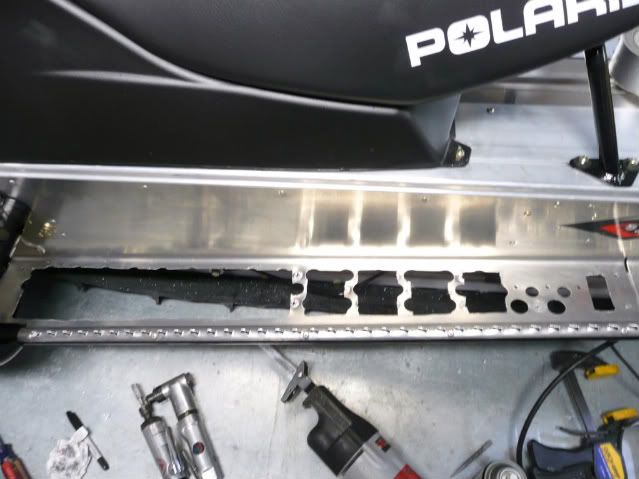
Spent 3 hours this afternoon & installed my Better Boards. If you have access to a Plasma I'd go that route. I used a Sawzall, air grinder, & nibber but it's hard to keep a clean cut & the "swiss cheese" boards bind the blade every time you cut between holes. For added support I left all the cross sections that I could...looks bad but you won't see them unless you ride upside down.
Marked the cutouts with a sharpie & used red for the webs I wanted to save. Could easily cut an hour off the time if you just cut out the whole section. In the front there's a belly pan rivet that I redrilled into the BBrd & did the same in the rear with the 3 rivets for the suspension bracket & the one suport bracket. I'll add another dozen rivets when Carl's gets more in stock. Want more rivets up front where there will be most of the stress.
Last edited:
Ron, Did you do all of your cutting from the top side? I have BB's on the way and was going to mark the cutouts, drill out all of the corners to make a clean radius, and then use a jigsaw from the bottom side for the cutouts. Do you think that would work well?
R
Ron
ACCOUNT CLOSED
Ron, Did you do all of your cutting from the top side? I have BB's on the way and was going to mark the cutouts, drill out all of the corners to make a clean radius, and then use a jigsaw from the bottom side for the cutouts. Do you think that would work well?
You will have to remove the rear suspension bracket to use the BB as a template but if you drill pilot holes from above then you could work out the locations templating from above. Not sure the small blade on a jig saw will work better or worse. If it binds like the sawzall blade it could easily break. Another thing I forgot to mention is I used lots of Duct tape for protection in case I slipped.
I did my cutting from above. A jigsaw won't let you get close enough on the tunnel side cutting from above.
Maybe Rob from BB will have something to add or just PM FBomb & ask him directly.
Last edited:
R
Ron
ACCOUNT CLOSED
Drive clutch issues
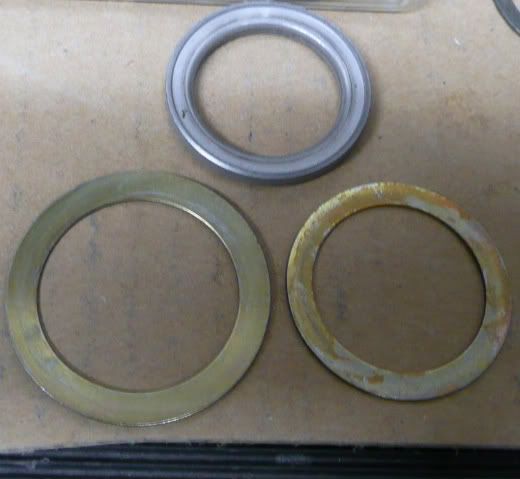
Mentioned earlier that the belt side clearance on my P85 was way off. Got a more exact measurement it was close to .068 vs spec of .005-.035. I knew something was wrong when the lock nut & spider almost fell off the clutch-they may have been torqued but loosened up, read on. What I found was that a washer was cocked under the helix but was surprised to see that it wasn't even the correct washer. Looks like the washer normally found under the snap ring on the old style driven clutches, too large to go under the recessed area of the spider. See pic.-washer on left was under spider & has been tweaked-washer on right is the correct diameter. The spacer at the rear is recessed on one side to fit over the shaft & has a lip on the other side to fit in the bevel in the spider. Taking the large washer out & using just the large spacer leaves over .050, still too much. It looks like the assembler saw that the side clearance was off & added the wrong washer rather than remove washers. I have parts to get it right but will run it by the dealer in the AM to see what they have to say.
Weighed the new wts part of the Carl's clutch kit. They are a little heavy & one was .1 grams heavier than the other 2.
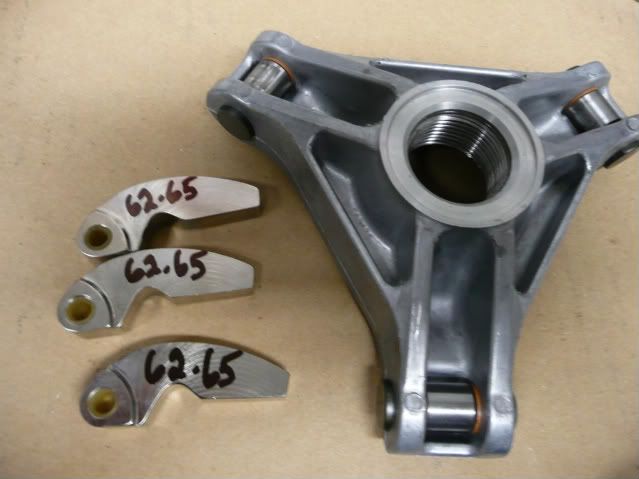
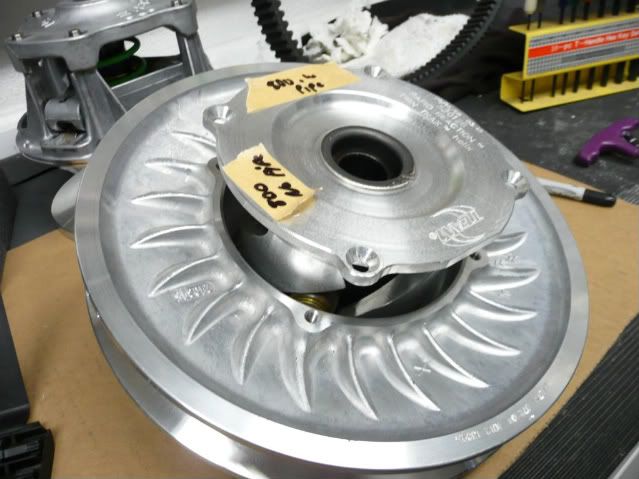
Also installed the new helix from Carl's. They come with a little different cuts this year. As I understand it one cut is for the 800 with stock pipe & the other the 800 with SLP pipe. I don't think it's my place to disclose the helix angles so taped over them.
Mentioned earlier that the belt side clearance on my P85 was way off. Got a more exact measurement it was close to .068 vs spec of .005-.035. I knew something was wrong when the lock nut & spider almost fell off the clutch-they may have been torqued but loosened up, read on. What I found was that a washer was cocked under the helix but was surprised to see that it wasn't even the correct washer. Looks like the washer normally found under the snap ring on the old style driven clutches, too large to go under the recessed area of the spider. See pic.-washer on left was under spider & has been tweaked-washer on right is the correct diameter. The spacer at the rear is recessed on one side to fit over the shaft & has a lip on the other side to fit in the bevel in the spider. Taking the large washer out & using just the large spacer leaves over .050, still too much. It looks like the assembler saw that the side clearance was off & added the wrong washer rather than remove washers. I have parts to get it right but will run it by the dealer in the AM to see what they have to say.
Weighed the new wts part of the Carl's clutch kit. They are a little heavy & one was .1 grams heavier than the other 2.
Also installed the new helix from Carl's. They come with a little different cuts this year. As I understand it one cut is for the 800 with stock pipe & the other the 800 with SLP pipe. I don't think it's my place to disclose the helix angles so taped over them.
R
Ron
ACCOUNT CLOSED
Update
Took my clutch to the dealer & Polaris agreed to take my clutch back & warranty it with a new clutch. I opted to keep the old one-I like the tight fit of the buttons & the rollers/weight position lines up well. I will have the clutch balanced again after making the changes. One thing I noticed worth consideration....the clutch cover bolts are different weights-.15 gram variation, not a lot but also at the outer part of the clutch. Soooooooo if you take the bolts out & don't put them back in the same order worst case you could change clutch balance a worst case of .3 grams. Might want to mark them 1-6 starting at the spider so that you can put them back in the same slots.
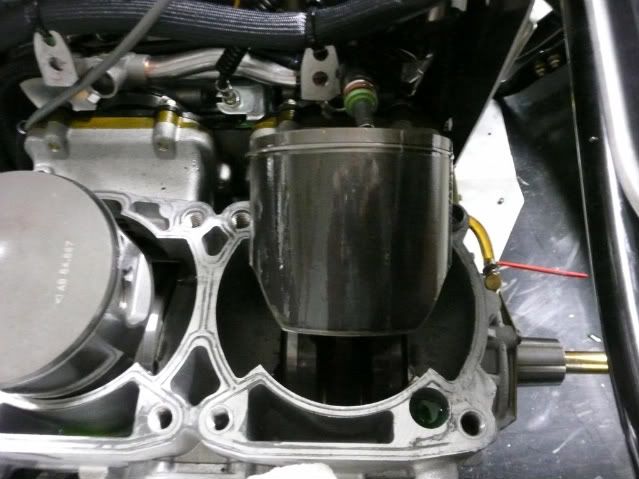
Just finished installing an SLP Powder Valve. Lucky I spoke with Chris, Carl's Performance first. He installed his but had trouble with the 3 point rivets hanging on the flap. The rivet with the kit spreads in a triangle at the back getting in the way of the flap. I installed mine with a regular Al rivet so avoided the issue. The flap is spring loaded, comes 2 to a kit, but I only installed one because I have extra intake venting in the dash.

Took my clutch to the dealer & Polaris agreed to take my clutch back & warranty it with a new clutch. I opted to keep the old one-I like the tight fit of the buttons & the rollers/weight position lines up well. I will have the clutch balanced again after making the changes. One thing I noticed worth consideration....the clutch cover bolts are different weights-.15 gram variation, not a lot but also at the outer part of the clutch. Soooooooo if you take the bolts out & don't put them back in the same order worst case you could change clutch balance a worst case of .3 grams. Might want to mark them 1-6 starting at the spider so that you can put them back in the same slots.
Just finished installing an SLP Powder Valve. Lucky I spoke with Chris, Carl's Performance first. He installed his but had trouble with the 3 point rivets hanging on the flap. The rivet with the kit spreads in a triangle at the back getting in the way of the flap. I installed mine with a regular Al rivet so avoided the issue. The flap is spring loaded, comes 2 to a kit, but I only installed one because I have extra intake venting in the dash.
Ron,
The powder valves look good... I'd like to see some kind of mesh over the opening to keep the airbox from sucking dirty air from under the hood (belt dust etc)...
Especially with it so close to the belt/clutches.
Thanks again for the Pix
The powder valves look good... I'd like to see some kind of mesh over the opening to keep the airbox from sucking dirty air from under the hood (belt dust etc)...
Especially with it so close to the belt/clutches.
Thanks again for the Pix
R
Ron
ACCOUNT CLOSED
Clutch & Powder Coating
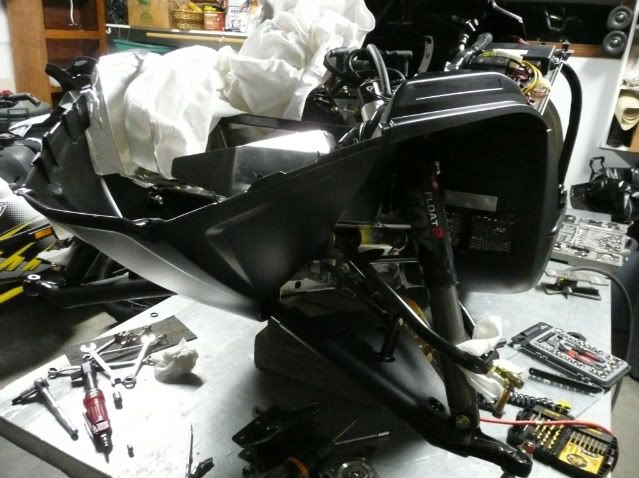
Well I did it, tonight I removed the bumper, steering arms & Spindles for powder coating. Any suggestions on color? I'm leaning toward red if I can get a close match or black if I can't. Also thought about white but decided againt it, would look good white with the A Arms done but I'm drawing the line there.
I have my drive clutch done now. Some discussion points:
1. I balanced the weights individually and also the outer cover bolts. Now if I remove the cover I don't need to worry about putting them back in the same slots-although I did code them 1-6 & installed starting with 1 on the cover in the X position & counterclockwise from there.
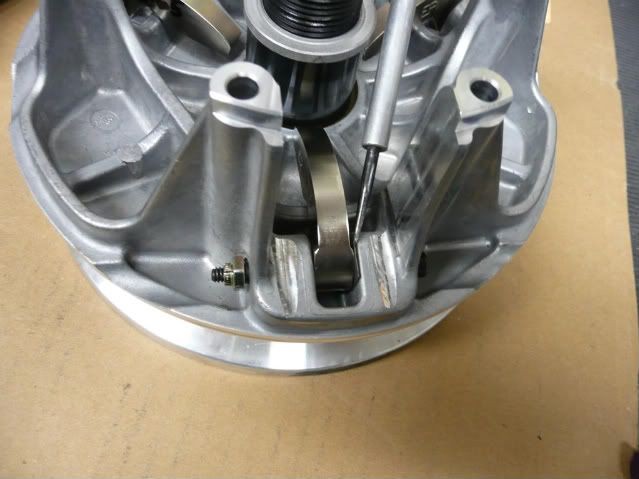
2. I added a small O ring (size R05) to the slack side of the weight bolt to eliminate movement of the bolt. The bolt will still turn but now has no side to side slop. As the bolt moves it has to change clutch balance. I haven't tried this before so will keep an eye on it.
3. I will now have my clutch balanced with all components installed, just the way I ride it.
4. The 09 clutch bolts have a bevel edge near the threads for easier insertion through the weight.
5. I ended up with .015 belt side clearance I'll check clearance after break in is complete-say 250 miles.
Finally, there is a good article by SLP in SW on clutches thats worth a read. Pic of the O rings...

Well I did it, tonight I removed the bumper, steering arms & Spindles for powder coating. Any suggestions on color? I'm leaning toward red if I can get a close match or black if I can't. Also thought about white but decided againt it, would look good white with the A Arms done but I'm drawing the line there.
I have my drive clutch done now. Some discussion points:
1. I balanced the weights individually and also the outer cover bolts. Now if I remove the cover I don't need to worry about putting them back in the same slots-although I did code them 1-6 & installed starting with 1 on the cover in the X position & counterclockwise from there.
2. I added a small O ring (size R05) to the slack side of the weight bolt to eliminate movement of the bolt. The bolt will still turn but now has no side to side slop. As the bolt moves it has to change clutch balance. I haven't tried this before so will keep an eye on it.
3. I will now have my clutch balanced with all components installed, just the way I ride it.
4. The 09 clutch bolts have a bevel edge near the threads for easier insertion through the weight.
5. I ended up with .015 belt side clearance I'll check clearance after break in is complete-say 250 miles.
Finally, there is a good article by SLP in SW on clutches thats worth a read. Pic of the O rings...
Last edited:
i just got mine today.
Well I did it, tonight I removed the bumper, steering arms & Spindles for powder coating. Any suggestions on color? I'm leaning toward red if I can get a close match or black if I can't. Also thought about white but decided againt it, would look good white with the A Arms done but I'm drawing the line there.
I have my drive clutch done now. Some discussion points:
1. I balanced the weights individually and also the outer cover bolts. Now if I remove the cover I don't need to worry about putting them back in the same slots-although I did code them 1-6 & installed starting with 1 on the cover in the X position & counterclockwise from there.
2. I added a small O ring (size R05) to the slack side of the weight bolt to eliminate movement of the bolt. The bolt will still turn but now has no side to side slop. As the bolt moves it has to change clutch balance. I haven't tried this before so will keep an eye on it.
3. I will now have my clutch balanced with all components installed, just the way I ride it.
4. The 09 clutch bolts have the bolt near the threads with a bevel edge now for easier insertion through the weight.
5. I ended up with .015 belt side clearance I'll check clearance after break in is complete-say 250 miles.
Finally, there is a good article by SLP in SW on clutches thats worth a read. Pic of the O rings...
well ron color wise I think red for both bumpers, steering arms,and knuckles,
Great work there Ron.
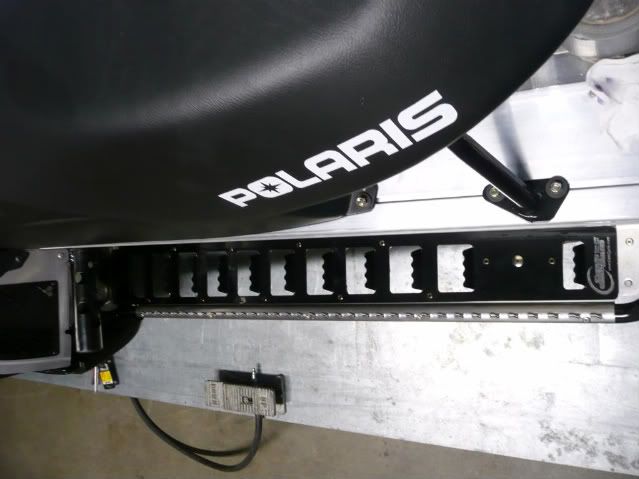
Gang on your Better Board installs especially for this application it's advisable to do one big hole as opposed to cutting cross beams or individual windows. Trust me on this one...I have thousands on the snow and I also ride these daily and very few people are putting more stress on these than we do. They are very strong!
I trim off an 1/8th of the rear most part of the black factory suspension bracket so that doesn't show up through the rear most window (just watch that rivet hole). Reuse the 3 factory rear suspension rivet holes and the very front footwell rivet hole. Drill and install the rest to your own preference.
R
Ron
ACCOUNT CLOSED
Well, almost done with my sled-now I made a big mess again. Parts out for Powder Coating & I decided to install the VF Reeds. Cylinders in the way so why not pull them now-porting scheduled for late Oct. I didn't pull my 08 down so don't know how the 09 compares except it has single ring pistons. I'm sure I read that the 08's were double ring. Hot damn more power.
First pic the top of the engine with the head off. Almost totaly devoted to coolant on top passing by both sides of the exhaust ports on the way out.
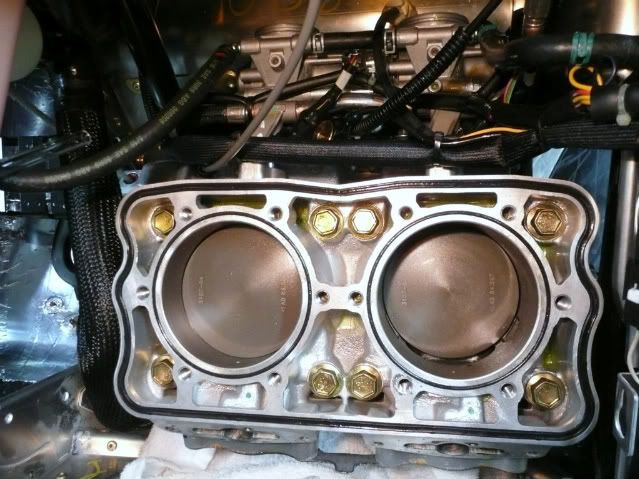
Pic of the Piston's
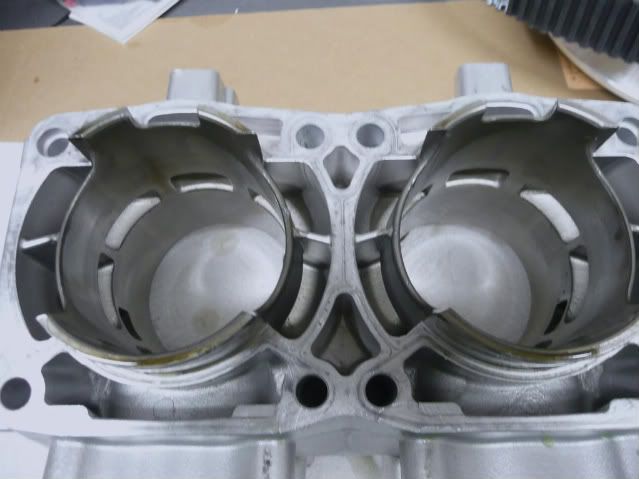
Bottom of the cyclinders are almost all fuel flow. Transfer ports take up both sides of the cyclinders with a rear booster port that gets the upper Fuel injection, mid cyclinder. The exhaust side has coolant pasages. Basically these have much less meat than you would see on the BB 8's from 2000-05. Much more cooling & more air. There was a sign of some minimal grinding to match cyclinder ports. The exhaust port is probably larger but I'm just going from memory. The exhaust side ports are larger & start near the center of the cyclinder, exiting into the large exhaust port behind the VES. (Not VES controlled)
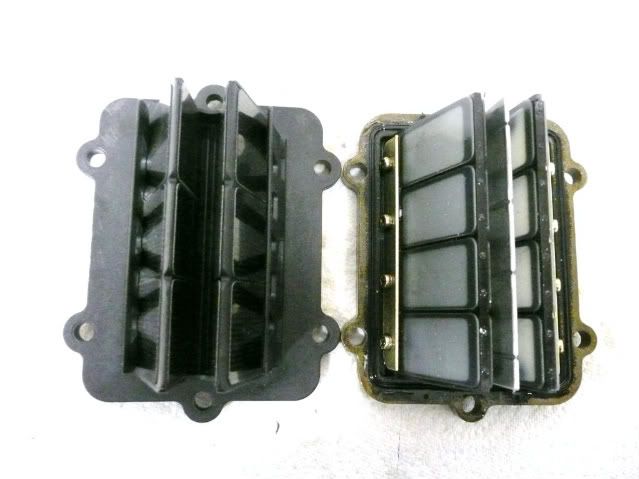
A Pic of the Vforce on left & stock reeds on the right. VF more bottom end, crisper throttle.
First pic the top of the engine with the head off. Almost totaly devoted to coolant on top passing by both sides of the exhaust ports on the way out.
Pic of the Piston's
Bottom of the cyclinders are almost all fuel flow. Transfer ports take up both sides of the cyclinders with a rear booster port that gets the upper Fuel injection, mid cyclinder. The exhaust side has coolant pasages. Basically these have much less meat than you would see on the BB 8's from 2000-05. Much more cooling & more air. There was a sign of some minimal grinding to match cyclinder ports. The exhaust port is probably larger but I'm just going from memory. The exhaust side ports are larger & start near the center of the cyclinder, exiting into the large exhaust port behind the VES. (Not VES controlled)
A Pic of the Vforce on left & stock reeds on the right. VF more bottom end, crisper throttle.
Last edited:
Ron
How about a picture of the exhaust ports Please.
How about a picture of the exhaust ports Please.
Similar threads
J
- Replies
- 4
- Views
- 2K
J