• Don't miss out on all the fun! Register on our forums to post and have added features! Membership levels include a FREE membership tier.

2009 Dragon 8 163" has arrived

R

Ron

ACCOUNT CLOSED
Dec 4, 2006
2,711
473
83
Boise
Glove bag

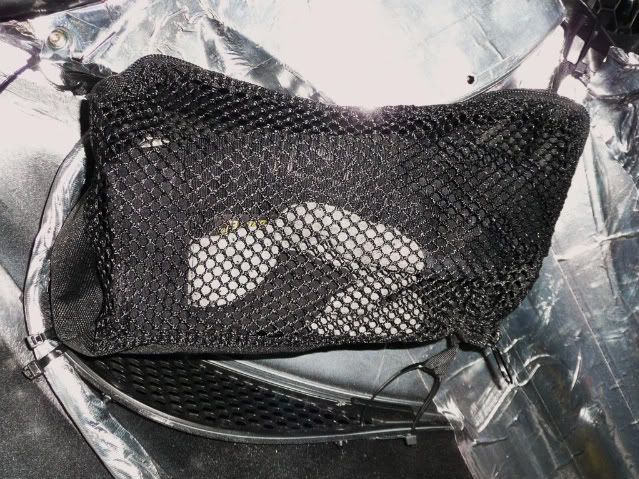
SW won't let me post any pictures. I'll try again later but the glove bag needs to be carefully placed to avoid the exhaust. The glue down tabs that come with the bag won't hold so I don't use them. Maybe with some silicone they would hold. I fasten the bag on all 4 corners with zip ties, requires drilling some holes. A picture would clear this up. You can actually drill a hole (used a hot screwdriver) through the upper left tab of the bag and fasten it to the hood plenum bolt on the lower far left side as a starting point.
 
Last edited:
  • Like
Reactions: Rob1334
R

Rob1334

ACCOUNT CLOSED
Feb 26, 2008
4,965
770
113
39
Bismarck, ND
Will be checkin back later, sounds like a great idea to mount a bag under there, plan on doing this to my sled!!
 
  • Like
Reactions: Ron
R

Ron

ACCOUNT CLOSED
Dec 4, 2006
2,711
473
83
Boise
Headlight adjuster

Last year I put black duct tape over the headlight knob. The tape has a gloss finish, just wasn't pretty, ha ha. I came up with something nicer-take a piece of 1 1/2" X 1 1/2" Velcro (fuzzy side) and cut a slot for the knob. It has a texture that blends with the hood and the velcro glue will stick! I rounded the sq. edges-it looks better than any of the AM products.
 
Last edited:
  • Like
Reactions: sledhead ut
R

Ron

ACCOUNT CLOSED
Dec 4, 2006
2,711
473
83
Boise
Thought I was done yesterday after setting track alignment and final torque to the drive clutch. My clutch bolt took another 1/3 to 1/2 turn after initial torque, then running track up to speed and setting the brake a few times.

Found out that my tall windshield and hand guards won't work together. The HG's hit the windshield so back with the stock windshield. The tall one didn't help (last year) that much anyway. With the tall you could duck behind it in freezing rain or extreme cold air but it put powder snow higher, sometimes in the face.
 
R

Ron

ACCOUNT CLOSED
Dec 4, 2006
2,711
473
83
Boise
underhood bag

Here's a pic of my glove bag underhood to go with the explanation earlier. I started at the upper left corner by putting an L bracket to lower the mounting point of that corner. It's hard to see but there is a piece that mounts to the torx bolt with an L that lets the zip tie mount 1" lower than the bolt. The bag is away from the vent and will away from the exhaust. The vent air keeps the gloves from getting as warm as it might but every time you stop or slow down heat rises warming whatever is inside. This won't dry a soaked set of gloves quickly but there is room for goggles and gloves or two pair of gloves-Not the heavy mittens but light riding gloves.

005-4.jpg
 
R

Ron

ACCOUNT CLOSED
Dec 4, 2006
2,711
473
83
Boise
I agree AO needs to show the guts too. Was that your Camo Xtreme I saw at Cartl's?
 
A

Anthony Oberti

Well-known member
Jul 4, 2001
1,504
525
113
48
Eagle, ID
Yeah, most likely, a 163x2.5. I picked it up this weekend. Still adding my touches to it, but here is some more pics.
 
Last edited:

AKSNOWRIDER

Well-known member
Lifetime Membership
Dec 25, 2007
8,882
4,431
113
62
anchorage
AO, who's kit did carls use on it? looks very nice..hope you will give a detailed ride report when you get it on the snow....
 
R

Ron

ACCOUNT CLOSED
Dec 4, 2006
2,711
473
83
Boise
Handy products

Here are 2 black adhesive backed products, much heavier than black duct tape that might come in handy with your snowmobile. The roll of vinyl tape is a used for burial protection for "black" gas pipe 2"wide-it's probably 10-15 mil. Scotch brand made by 3M, I've had it a while so don't know availability. The second product is also 3M and is heavier yet, 4" wide textured finish. It can also be purchased with a sandpaper finish & is used on boats, RV's as a protective strip for traction in wet conditions. I replaced the piece of velcro that I originally put over the headlight adjuster with a piece of this. I used a piece of the tape along the lower side to cover some of the aluminum and the gap near the front torque arm. Both appear to be cold weather products, will see this winter. For anyone looking to cover up some of the raw aluminum, the 4" strip would be great...good adhesion, I had some on my aluminum boat that held very well.

003-4.jpg
 
R

Ron

ACCOUNT CLOSED
Dec 4, 2006
2,711
473
83
Boise
Clutch Offset

I received my new Polaris tool for setting clutch offset. It has the foreward canted engine angle built into the tool. I thought I could lay a straight edge along the rear of the tool to find out the offset from the front fixed on the driven but the angle is built into the part that fits against the fixed drive clutch sheave. This is a precision tool but still requires some care in using it-easy to let it twist out of place. Here's a picture of the new $140 tool and an older one for the edge with 5/8" offset. Incidently as mentioned previously 5/8" is .625" this should be 17mm or .670" so most tools are built off .045.

002-4-1.jpg


The first step was to gather all the shim washers I could find. You will need some for behind the driven and some behind the bolt of different thicknesses. Polaris has 3 washers available to shim behind the driven: .120; .060 & .023. I found another size .030 and soon discovered that I would need 2 each of the .023 & .030 to maximize options.
To change shims behind the bolt there are only 2 sizes available from Poo. The standard washer is .0625 & a smaller one got mixed in with my others, think it was .046. Soon realized these didn't offer enough options so dug through my supply and found some others. (Stainless come in narrower widths) I ended up with .041; .046; .057 ;.060; .0625; & .064 washers. Pic of tool on the clutch-

001-7.jpg


I won't duplicate the instructions a few posts back. You want high speed offset with the clutch pulled toward you and then .030 to .050 float in toward the bearing side. I went about it with a slight variance from the instructions. First got the off-set with the clutch pulled toward me by changing the washer stack on the bolt. I had the washers needed to get mine exact but option B would be to remove a little material from the Aluminum bushing. Second step I measured the "float" and made adjustments to the washers behind the driven to get what I needed.
I found that my engine alignment is nearly perfect from the factory-when the tool was touching the driven on the left there was .002 gap on the right. I was able to get my alignment very close to perfect. Good enough for an "anal" perfectionist. I ended up with .039 of float with a spread on each side. I have .003 excess at high speed and .006 past the minimum .030 for engagement. If the tool provides offset of .0670 with ideal float to .0640 then mine would be .0673 to .0634. Polaris instructions allow a variance of .025, (.060 on engine alignment) probably as close as some belt tolerances. My sled came from Carl's with alignment in spec but I got it closer.
 
Last edited:
Premium Features