• Don't miss out on all the fun! Register on our forums to post and have added features! Membership levels include a FREE membership tier.

Installation & Review: Yamaha OEM Turbo & MPI Stage One Upgrade

2Huskies

Well-known member
Lifetime Membership
Jul 19, 2009
581
206
43
Rigby, Idaho
Charge Tubes Installation CAC

Step 47
Remove the top half of the heat shield and flip over the #1 exhaust clamp so the bolt is on the opposite side

turbo4009.jpg


Here we have it flipped over. It was pretty simple...

turbo4010.jpg
 

2Huskies

Well-known member
Lifetime Membership
Jul 19, 2009
581
206
43
Rigby, Idaho
Charge Tubes Installation CAC

Step 48-

Re-Install the Heat shield securely. Then Bend the heat shield assembly over the OE exhaust pips. The whole goal here is to create clearance for the center CAC tube

My first attempt

turbo4011.jpg


Second attempt and with this it just barely fit in. There is definitely alot of twisting and turning to make it fit.

turbo4012.jpg


Before the center CAC tube will fit the M10 nut connecting the rear of the LH steering support hoop has to be removed. The center CAC tube is going to be mounted there via that nut.

Its seen here mounted

missed002.jpg


Now make sure that underneath the sled the Center tube is connected to the first one we installed

Here is the underside of the sled

turbo4013.jpg


Again making sure not to over tighten the T clamps.
 

2Huskies

Well-known member
Lifetime Membership
Jul 19, 2009
581
206
43
Rigby, Idaho
Charge Tubes Installation CAC

Step 52

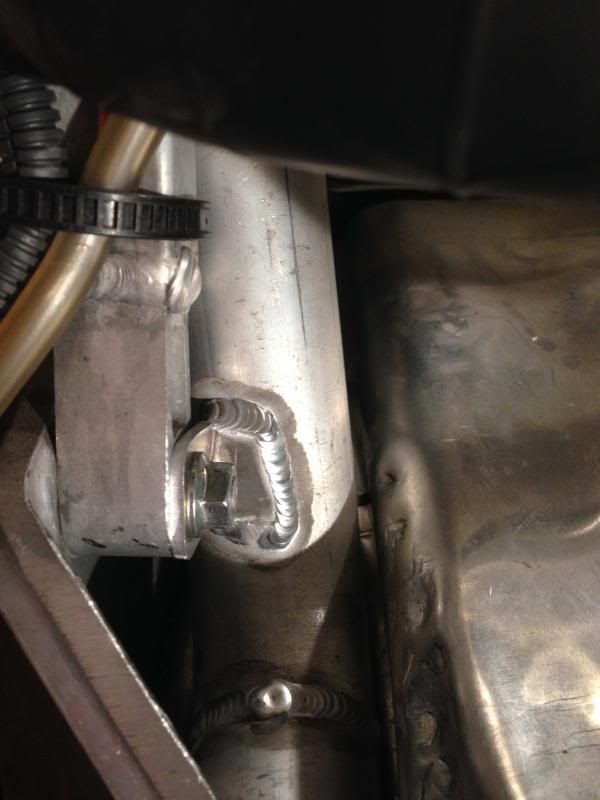
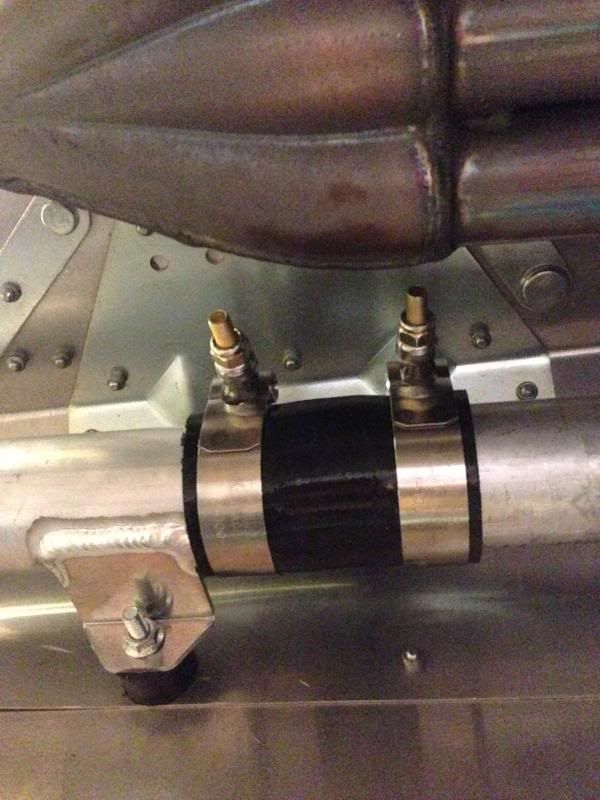
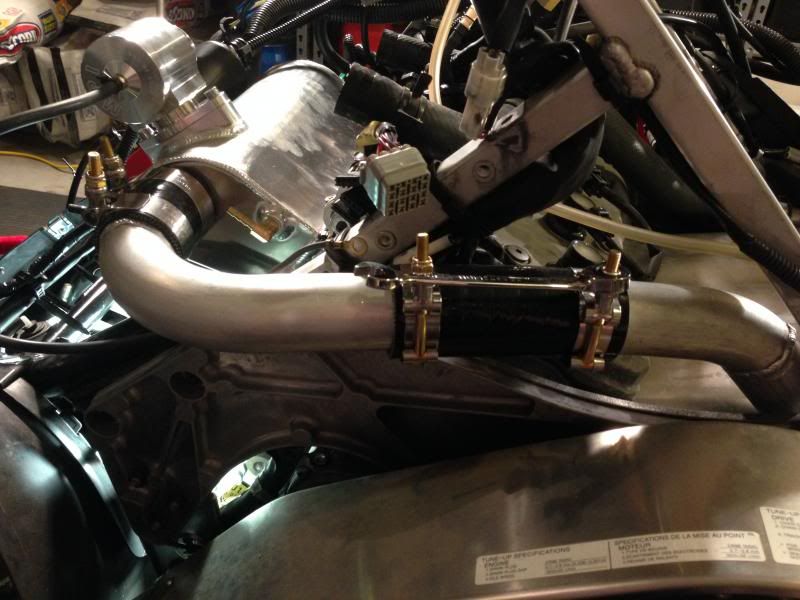
Once the Center tube is connected to the rear CAC tube. Along with all the T clamps being tightened down between the M8 nut (There are 4 that should be tightened down) Then that M8 nut can be fully tightened down.

Step 53

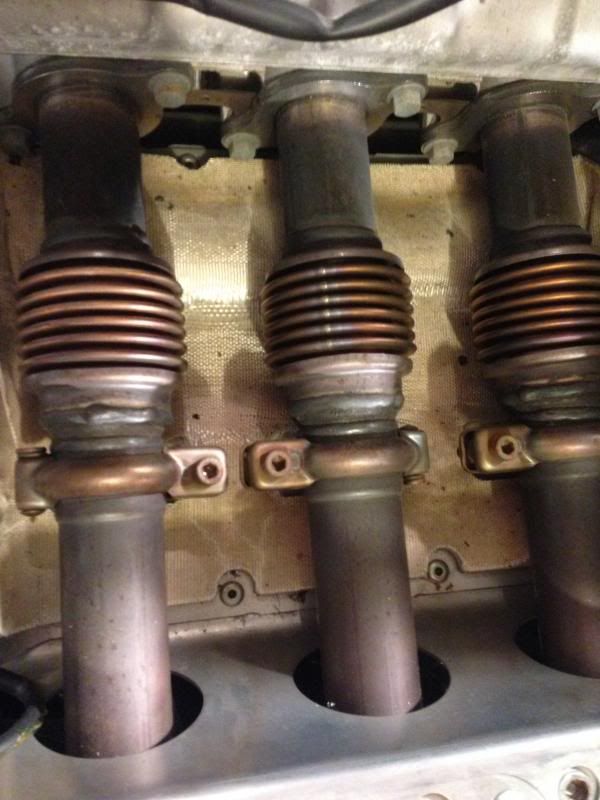
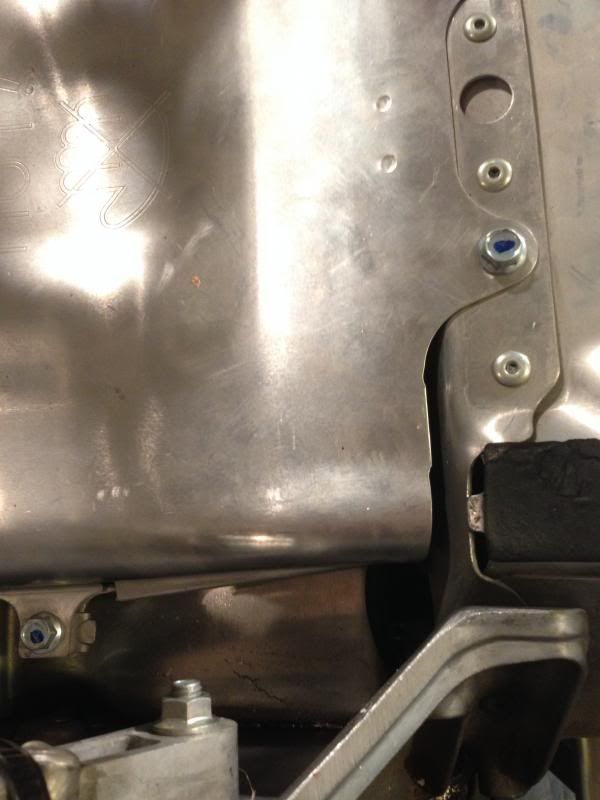
Mount the last two remaining CAC tubes. Note the direction that the bolts are facing so as to not interfere with anything. Again do not overtighten

turbo4015.jpg


Then with that, I went back checked all of the T-Clamps and the CAC tube install is complete.

Again I promise to return to the normal amount of pictures, yesterday was a total of 13.5 sled work hours. That last hour just kinda rode me down haha

I hope you are all enjoying this as much as I am. For all intents and purposes it really is a direct install, the instructions are very helpful. Again, I am a guy with 0 experience with a wrench on anything and I am doing this without to much difficulty. Definitely lots of little things to pick up, but I am learning as fast as i can! Cant wait for boost! Thanks MPI!

Onto the next step!
 

christopher

Well-known member
Staff member
Lifetime Membership
Nov 1, 2008
81,927
27,615
113
Rigby, Idaho
Again I promise to return to the normal amount of pictures, yesterday was a total of 13.5 sled work hours. That last hour just kinda rode me down haha

I hope you are all enjoying this as much as I am. For all intents and purposes it really is a direct install, the instructions are very helpful. Again, I am a guy with 0 experience with a wrench on anything and I am doing this without to much difficulty. Definitely lots of little things to pick up, but I am learning as fast as i can! Cant wait for boost! Thanks MPI!

Onto the next step!
Sounds like you had a busy productive Saturday!
 

autopro

Member
Lifetime Membership
Feb 22, 2006
114
19
18
68
Vancouver Island BC
Good job!!! I installed one of the first 180 kits they produced before they provided instructions and the install went well due to the great manufacture of their kit and the pictures that Darren provided from E&S cycle. Since then I have installed the 230 upgrade. After that Moto's bridge and now Evolution Motorsport's computer reflash. Autopro:)
 

christopher

Well-known member
Staff member
Lifetime Membership
Nov 1, 2008
81,927
27,615
113
Rigby, Idaho
Charge Tubes Installation CAC

So I pulled the brain out of my sled today to send it back to MPI to have it re-flashed. As part of the turbo package they do this for you. Im also excited because they said they are gonna make my hand warmers hotter as a little side bonus haha! Over all its just to make the timing work better with the turbo which is cool its included.

I don't think so...
I am also sending in my Yamaha ECU to have it reflashed as well, BUT, I don't think they are offering this reflashing as part of any hardware package they are selling.
This is an option they offer anyone who wants to squeeze out some better performance from their engine management system in the form of better timing and temperature control.

41gTlAe2LxL._SX160_.jpg


Product Details

Safety Flash:
In this software recalibration, the way the ecu reads the water temperature sensor is rescaled so that engine protection maps are engaged 20 deg F sooner than stock (stock 212F, now 190F). This will also turn on the temp light on the dash sooner. The stock parameters are not sensitive enough to protect the engine while under boost. If the temp light comes on while on boost, it is likely that the engine will be damaged before you can react to protect it. Our software flash will alert the rider and begin to protect the engine by reducing timing to help safeguard against engine damage due to temperature induced detonation caused by high water temperatures. This flash works on ANY Normally Aspirated, Turbo or Supercharged Nytro as long as it utilizes the stock ECU


  • Merchant SKU: ECU-YNYT-WT-IT
  • A must for turbo charged or super charged Nytros - there is NO margin in the factory progamming
  • Progressively engages the timing protection maps 20 deg F sooner
  • Helps to safegaurd the engine against temperature induced detonation
  • Works on ANY Nytro utilizing the stock EC
Timing Reduction Flash.

  • Merchant SKU: ECU-YNYT-WTTM-IT
  • Remaps the stock timing tables to a more boost friendly curve
  • May allow 50/50 race gas kits to run 91 Octane or allow 2-3 more pounds of boost at the same fuel quality
  • May remove the need to install a head shim on higher boost kits
  • Works with Super Charged or Turbo Charged Nytro utilizing the stock ECU
 
Last edited:

Matt@MPI

Well-known member
Lifetime Membership
Dec 3, 2010
293
264
63
Mountain Performance Inc. (MPI) in conjunction with our technology partner Evolution Powersports<O:p</O:p
are proud to announce a broad range of ECU Programs for the Yamaha Nytro. Our strategic development group has spent the last 3 years perfecting a variety of different OEM ECU software calibrations that are ready to be unleashed on the Yamaha community.
<O:p</O:p
Safety Flash: In this software recalibration, the engine timing is re-calibrated to reduce ignition timing as water temperature increases and the temperature light illuminates 20 deg F sooner than stock (stock 212F, now 190F). The stock parameters are not sensitive enough to protect the engine while under boost. When the stock program turns on the temp light while on boost, the engine may already have been damaged. Our software flash protects the engine by reducing timing as water temperature increases to help safeguard against engine damage. The rider is also alerted by illuminating the water temperature warning light.
Part # HSE-0060 $299 (or $99 when added to 550cc Injector Flash).
<O:p</O:p
Reduced Timing Flash: In this software recalibration, the ignition timing tables are re-mapped to compensate for boosted applications. Ignition timing is gradually reduced as the engines load (throttle position) increases which is essential in eliminating engine detonation. The reduction of ignition timing allows for more boost at any given octane fuel. Example: if OEM programming is safe at 5PSI of boost, this re-map would allow 8PSI of boost while using the same fuel. A second example: Vehicles running race gas to allow a given boost level could now be run with pump premium fuel. It many cases this flash can eliminate the need to run a head shim (and remove all the liabilities of having to disassemble and reassemble the engines cylinder head). A good rule of thumb is that this calibration allows for 2 to 3 more PSI of boost without further engine modification or fuel octane increase.
Part # HSE-0062 $299 (or $99 when added to 550cc Injector Flash).
<O:p</O:p
Safety Flash with reduced timing: In this software recalibration, the safety flash and reduced timing flash are combined to offer the ultimate performance and engine safety package.
Part # HSE-0061 $399 (a $200 savings
<O:p</O:p
2008-2011 Nytro hand warmer fix: Hand warmers on earlier model Nytros do not get as warm or heat up as fast as the 2012 and later models. This is due to the ECU’s programming and is actually not the warmers themselves. By simply re-flashing the OEM ECU grip warmer performance is greatly enhanced. The recalibration increases power output to the hand warmers which makes them function more effectively. After the re-flash the grips actually get hot while the engine is idling. The increased grip warmer is immediately noticed and appreciated by the driver.
Part # HSE-0066 $99.00 ($79.00 when combined with any other flash package HSE-0067)
<O:p</O:p
550cc Injector Flash (used in conjunction with MPI/Bosch 550cc injectors): This software recalibration replaces the OEM 330cc injectors with 550cc injectors. The 550cc re-flash is used in conjunction with your existing piggyback / auxiliary fuel controller. The 550cc injectors allow for 40% more fuel versus the OEM injectors. The vehicle maintains perfect drivability with 550cc injectors, with no hiccups, glitches, etc. It is widely accepted that supplemental fuels controllers do a great job of managing fuel for boost as long as the OEM 330cc injectors are maintained; unfortunately horsepower is limited by the injector size. With the 550cc re-flash, the OEM computer compensates for the larger injectors leaving the piggyback / auxiliary fuel controller to manage the boost fuel. Property scaled larger fuel injectors are the only way to increase fuel delivery and have an OEM like performing engine – without hesitations, stumbles, etc. The OEM computer contains all the knowledge and strategies for idle, acceleration, deceleration and all other transitional throttle changes. When the OEM injector size is changed, the OEM computer must have all of its tables re-mapped to compensate. If the OEM ECU isn’t remapped, the piggyback / auxiliary fuel controller must constantly try to second guess and correct for transitional changes that are miss-managed by a non-reprogrammed OEM computer. This also eliminates the need for a second set of supplemental injector; an alternate method sometimes used to overcome the 330cc injector limitation. Idle RPM has been increased by 150 RPM, eliminating the need to manually adjust the OEM throttle stop (manually adjusting the throttle stop often results in unexpected idle characteristics because the computer’s ability to electronically control idle has been overridden). This software flash is sold in conjunction with high quality Bosch 550cc injectors, which includes all necessary hardware for direct replacement of the OEM 330cc units.
Part #s HSE-0063 & HSK-1238 $799 (includes injectors and hardware). <O:p</O:p
Please specify Vehicle Year plus Supercharger or Turbocharger type<O:p></O:p>
 

christopher

Well-known member
Staff member
Lifetime Membership
Nov 1, 2008
81,927
27,615
113
Rigby, Idaho
Mountain Performance Inc. (MPI) in conjunction with our technology partner Evolution Powersports<o:p</o
are proud to announce a broad range of ECU Programs for the Yamaha Nytro.
<o:p</o
Safety Flash with reduced timing: In this software recalibration, the safety flash and reduced timing flash are combined to offer the ultimate performance and engine safety package.
Part # HSE-0061 $399 (a $200 savings
<o:p</o
2008-2011 Nytro hand warmer fix:

I am thinking thats what CBP is after for his sled.
I am getting the Safety Flash with Reduced Timing for Nytrocity.
 

Matt@MPI

Well-known member
Lifetime Membership
Dec 3, 2010
293
264
63
I am thinking thats what CBP is after for his sled.
I am getting the Safety Flash with Reduced Timing for Nytrocity.

95% of the ECU that we've done this year have been the Safety flash and the reduced timing. If you have a pre 2012 and haven't fixed the crappy hand warmer then that’s a perfect time to do it.<O:p</O:p
 

adairtd1

Well-known member
Lifetime Membership
Oct 23, 2011
282
124
43
La Grande, Oregon
95% of the ECU that we've done this year have been the Safety flash and the reduced timing. If you have a pre 2012 and haven't fixed the crappy hand warmer then that’s a perfect time to do it.<O:p</O:p

That's what I did for my sled as well, can't wait to try it out. You ever get your software keys from Yamaha? Dustin mentioned something about it delaying all of the reflashes when I was asking about my ecu last week.
 

christopher

Well-known member
Staff member
Lifetime Membership
Nov 1, 2008
81,927
27,615
113
Rigby, Idaho
95% of the ECU that we've done this year have been the Safety flash and the reduced timing. If you have a pre 2012 and haven't fixed the crappy hand warmer then that’s a perfect time to do it.<o:p</o
Certainly beats having to do the fully Yamaheater installation IF the results are the same.
 

Matt@MPI

Well-known member
Lifetime Membership
Dec 3, 2010
293
264
63
That's what I did for my sled as well, can't wait to try it out. You ever get your software keys from Yamaha? Dustin mentioned something about it delaying all of the reflashes when I was asking about my ecu last week.

We had a little back log on re-flashing. We've shipped all of them back out. We also adjusted how we handle the whole process and now are set up to turn them out within one day, most of the time the same day as we get them in.<O:p</O:p
 

2Huskies

Well-known member
Lifetime Membership
Jul 19, 2009
581
206
43
Rigby, Idaho
Sorry for the slip of the tongue there, that is exactly what I meant there Christopher.

I have sent out my ECU today to have the safety flash done to it.

Also the last parts of the install should be posted tomorrow! The sled wont be put all back together but the install steps may be finished!

Stay tuned.

Again thank you MPI for the great product!
 

2Huskies

Well-known member
Lifetime Membership
Jul 19, 2009
581
206
43
Rigby, Idaho
Well guys I had to send my ECU in to get reflashed. So its gonna be able two weeks till I see that back and can continue with the installation. But tonight I will show you the last step I spent my time on.

I installed an oil pump, ran some tubing and got as far as i could until i had to start putting the steering column back together.

Stay tuned!
 

2Huskies

Well-known member
Lifetime Membership
Jul 19, 2009
581
206
43
Rigby, Idaho
TURBOCHARGER OIL SYSTEM INSTALLATION

Step 54-57

Remove the plastic plug from the RH side of the valve cover. Then remove the black O-Ring from it and save it to be reused.

Sledoil002.jpg


Install the Aluminum adapter with the OEM O-ring into the valve cover

Sledoil003.jpg


Sledoil004.jpg
 

2Huskies

Well-known member
Lifetime Membership
Jul 19, 2009
581
206
43
Rigby, Idaho
TURBOCHARGER OIL SYSTEM INSTALLATION

Step 58-59

Install the brass 90 deg elbow with thread sealant into the aluminum adaptor you just installed in the valve cover. While holding the aluminum adaptor (so as to not over tighten the aluminum adaptor) tighten the brass elbow. Point the elbow towards the back of the vehicle angled slightly towards the center (about the 7 o-clock position)

Thread sealant
Sledoil005.jpg


Remove the #3 coil so you can install the brass elbow

Sledoil006.jpg


Make sure that the elbow is pointing at 7 O'clock and once it is seated tightly re-install back the #3 coil if you removed it.

Sledoil007.jpg
 
Last edited:

2Huskies

Well-known member
Lifetime Membership
Jul 19, 2009
581
206
43
Rigby, Idaho
TURBOCHARGER OIL SYSTEM INSTALLATION

Step 60 - 62

Now I did this step a little different then what the instructions said. Since I was struggling with doing it their way I created my own method.

Using this plate
Sledoil016.jpg


Along with this pump and assorted bolts and washers.
Sledoil017.jpg


Sledoil020.jpg

The easiest way I found to do this step was to first attach the black tube to the RH side of the pump as shown here. Once you attach that tubing go ahead and attach the pump to the MPI plate in the manner the instructions tell you to.

But on the LH side, (or the side that doesnt have the tube on it we just attached) only barely attach the pump to it. Then go and mount the MPI plate to the sled via the black steel mounting brackets.

Once the plate is mounted to the sled, go ahead and attach the pump fully to the plate.

What i found doing it this way was that via the instructions i wasn't able to attach the black hose and attach the oeitker clamp unless i reversed some of the instructions.
 
Last edited:
Premium Features