Install the app
How to install the app on iOS

Follow along with the video below to see how to install our site as a web app on your home screen.

Note: This feature may not be available in some browsers.

  • Don't miss out on all the fun! Register on our forums to post and have added features! Membership levels include a FREE membership tier.

Installation and Review: SKINZ Air Frame Running Boards

In the process of getting ready to rivet these boards into place I got in some practice tonight.

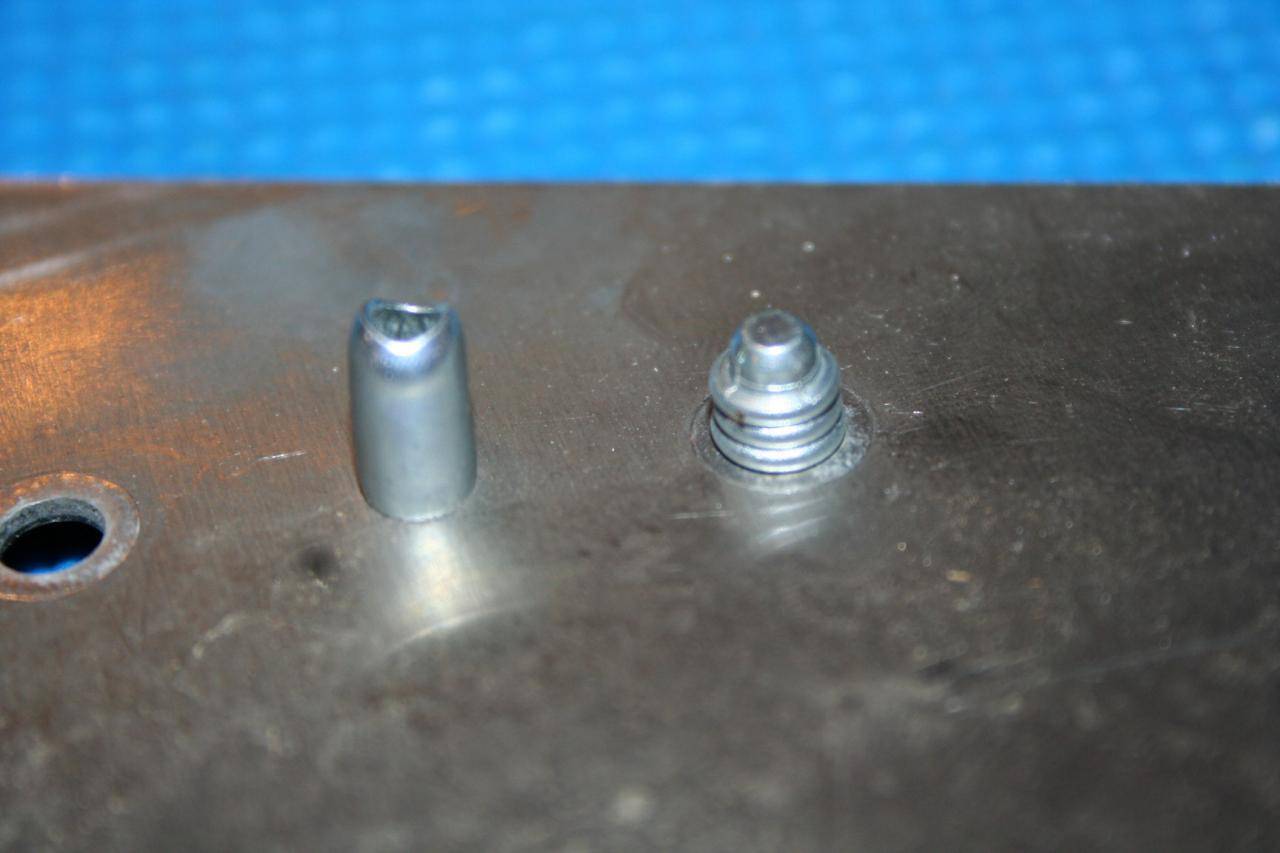
So, I shot my first rivets into my sled this evening and I used BOTH the generic and the ones I got from OFT Racing.

HOLY SMOKES

The difference is HUGE.

A rivet is NOT just a rivet!!!
The Yamaha OEM Rivet from OFT on the right, and the generic one on the left!

Which one do you think is the better solution??
picture.php

__________________
 
Preparing the underside of the boards for the bonding agent required that I grind off a small portion of the powdercoating to ensure a solid metal to metal contact surface.

picture.php


picture.php
 
In the process of getting ready to rivet these boards into place I got in some practice tonight.

So, I shot my first rivets into my sled this evening and I used BOTH the generic and the ones I got from OFT Racing.

HOLY SMOKES

The difference is HUGE.

A rivet is NOT just a rivet!!!
The Yamaha OEM Rivet from OFT on the right, and the generic one on the left!
Which one do you think is the better solution??


picture.php

__________________

Are the "generic" rivets the ones provided with the AirFrame boards? Until you installed and pulled both of them as a comparison it's would be hard to see the difference. The Yamaha rivet looks 100% better.

How's the adhesive working out? With quality Yamaha rivets those boards won't be moving anytime soon.

Post up some progress pics please! :camera:

akrevrider
 
The rivet on the left came with the kit from Skinz.

This weekend I am going to try and finish the project.

If all goes well I will have plenty of new photos of the actual bonding process and riveting and then I can get going on the rest of the projects!!
 
The rivet on the left came with the kit from Skinz.

This weekend I am going to try and finish the project.

If all goes well I will have plenty of new photos of the actual bonding process and riveting and then I can get going on the rest of the projects!!


Christopher
Could you take the weekend and try to figure out how to get rid of the annoying Tracks USA ad? If this is the kind of in your face advertising we are going to be seeing, I'll take a refund on my subscription. :face-icon-small-win
 
Sorry Guys, there is nothing I can do about that issue.

I have NO control over the boarders of the page that surrounds the forums.

That territory is owned by the advertising department of the magazine, and I have no say over what they do with it.

Your best bet is to send a PM to "ADMIN" here on the forums.
That will get to the powers that be.
 
Took some weight measurements today.

Old boards that were cut off.
52.4 ounces (each)

New Boards
69.4 ounces (each)

Traction Studs
4.8 ounces per side

Rivets
5.2 ounces per side

Bolts
1.7 ounces per side


TOTALS

OLD = about 107 ounces removed

NEW = 161.7

Net Gain = + 54.8 ounces

I bet that number goes BLACK if you weighed the sled with the old boards after riding full of snow and now. Weight loss would be substantial.
 
I bet that number goes BLACK if you weighed the sled with the old boards after riding full of snow and now. Weight loss would be substantial.
There would be NO COMPARISON at all.
This setup it not going to hold any meaningful amount of snow at all!
 
Finally got to MOUNT the boards on my sled today!


This is the Lord 406-19 Acrylic Adhesive loaded in the manual dispenser.
picture.php


This is the Mixing Tube that comes with the Adhesive.
The tube has three different diameters on the end for you to choose from.

picture.php


I trimmed it to the largest diameter available.
picture.php


Final cut as large as I could get it.
NOTICE that I am wearing gloves.

This stuff is NASTY.
I would not recommend handling this without gloves on.
I wasn't even able to get the plugs out of the main tubes without getting it all over my gloves. And make sure you do this with some ventilation. It gives off some strong odors. I discharged about 25% of the primary contents before I attached the mixing tube as some of it had separated and I wanted to make sure I got into the best portion deeper in the tube.

picture.php
 
Prior to applying the Adhesive, I prepped all of my rivets, nuts, bolts, and clamps.

One the Adhesive enters the mixing tube you have 6 minutes before this stuff gets THICK and starts to harden!!

When it comes out the nozzle its almost like WATER. It is VERY VERY viscous!
But it starts to set up FAST.

Make sure you are 100% ready to rock and roll when you squeeze the trigger...

picture.php


As the 2 part adhesive enters the mixing tube you can watch it blend together.

picture.php


When it comes out it is very viscous.
picture.php


picture.php


picture.php
 
After laying down as large a bead as I could, I went back over and laid down a second bead. After all was said and done, I probably should have laid down a little more. There were several places that were not 100% covered and bonded. In the end I doubt it will make any difference at all, but when I do the other side tomorrow, I will use more Adhesive. Once the boards were mounted and the excess "oozed" out it was VERY easy to wipe away with some shop towels.

Note.
Keeps lots of them on hand and ready to go.
Again, you only have 6 minutes when this stuff is liquid.
By 10 Minutes it was very think and pretty much fully set up.
Though I could wipe it off the tunnel so long as I used a little muscle to get the excess off. 6 minutes goes by very quickly...


The board is laid in place on the Adhesive and the forward and rear bolts are inserted to ensure proper alignment before the rivets are set.
picture.php


Board is bolted to the tunnel now.
All the Rivets have been inserted into the pre-drilled holes.
http://www.snowestonline.com/forum/forum.vb/picture.php?albumid=1821&pictureid=19131
picture.php


Clamps are now in place and its time to use the Rivet gun to set all the rivets.
NOTE: You MUST MUST MUST clamp the Tunnel lip to the Boards. While its a pretty close fit, it is not 100% I found the clamps made a noticeable difference in pulling the boards and the Tunnel together before I set the rivets.
picture.php
 
This is the rear of the boards where the boards no longer mate up with the lip.
If I had the opportunity to do this a 2nd time, I would have cut the lip at the rear of the tunnel a little bit wider than instructed to so there would have been a bit more lip let to sit under this part of the boards.

picture.php


picture.php
 
AirFrame Board Install

Christopher,

Awesome thread! Very informative details, pictues and tips.

This will help make a lot of AirFrame Board installs much easier now.

Appreciate it,

akrevrider
 
I am happy to have been of service.
I am really very happy with the final result as of now.
Of course I won't know how they work for another 2 months or so now till we have some snow to go play on. But I am expecting them to be everything I was told they would be.
 
Premium Features


Back
Top