Install the app
How to install the app on iOS

Follow along with the video below to see how to install our site as a web app on your home screen.

Note: This feature may not be available in some browsers.

  • Don't miss out on all the fun! Register on our forums to post and have added features! Membership levels include a FREE membership tier.

Installation and Review: Mountain Performance Inc, Stage 1 & 2 Supercharger

Thread Rating
5.00 star(s)
20. Carefully pull out on cover – use caution with the gasket. May require pick or similar tool to save gasket.
Note: Additional oil will drain.
Note: Large magnet will pull against you.
Note: Starter drive gear and pin may fall out - small gear faces out; large gear in.


With all the bolts removed its time to grab hold of the cover and PULL it off.
picture.php


Knowing full well I was going to get MORE oil, I stuffed more rags under the cover trying to keep the oil off my skid plate and garage floor.
picture.php


While the cover comes "Loose" from the engine pretty easily, it does NOT come out from the frame enclosure easily! Be prepared to twist it too and fro several times till you find the sweet spot where the darn thing finally clears the frame rails and comes out.
picture.php


Sure enough, the starter gears DID come loose.
picture.php
 
Last edited:
21. Remove and discard stock crank bolt and washer with 19mm socket using ½“ impact wrench. Standard Right Hand thread. See Figure 16. Note: There is a bent wire that goes inside the crank bolt. Carefully Remove and Save wire. It is reused in new bolt!


I set the engine cover on the A-Arms which seemed to fit just perfectly :face-icon-small-hap
picture.php


The impact wrench made short order of removing the main bolt.
picture.php


And out came the bolt and the small attached wire.
picture.php
 
22. Clean inside mating surface of the crank end around threads and the threads themselves (must use
solvent, such as brake clean.) Note: Avoid solvent contact with magneto coils/wires.

picture.php


They want this hole CLEAN


picture.php


Start Blasting away with some BrakeClean.
picture.php
 
23. Clean the OEM side cover gasket surface. Replace with new gasket if OEM gasket is damaged. Clean side cover and crankcase gasket surfaces with “Brake Clean”.

Gloved up and started to clean the gasket surfaces on the engine and the cover.
picture.php


picture.php


The gasket came off VERY CLEANLY.
No reason at all to replace it.
Just needed some minor cleaning to be ready to use again.
picture.php


There was very little gasket sealer left on the surfaces to clean off.
picture.php
 
What did anoy me though was the fact that the engine kept "Weeping" oil from this lower channel. This went on for a good hour+
picture.php


I finally set up a little wick and just let it drain.
picture.php


My concern was that I didn't want it leaking oil as I replaced the gasket. I wanted a nice dry clean metal surface to put the gasket back on against.
 
24. Test fit the PTO onto the crank end; do not bolt into place yet! There is a small dowel pin in the end of the PTO extension that locks into the keyway slot in the flywheel. With the PTO shaft extension held against the end of the crank / flywheel make a BLACK PEN mark on the outside end of the PTO extension noting
the 12:00 o’clock position.

Practice putting the PTO extension on and how the PTO feels when it drops into the keyway slot on the flywheel as you will be doing this blindly with the cover in place.


picture.php


With the PTO in place, its time to mark the 12:00 location so you have some visual reference of where it should be when you go hunting for the key hole.
picture.php

 
Last edited:
25. Apply small amount of 3M Semi-drying 1104 or Semi-drying Yamabond 1215 (silicone will work in a pinch)
to only 3 locations. 1 & 2 where crankcase halves meet and 3 around rubber wire gasket at top rear of
cover.


I failed to get a photo of this.
You will find 2 very small joints in the crankcase if you follow along the surface of where the gasket sits. The joints were roughly at 3:00 and 7:00 when looking at the engine. Just look closely and you will see the small metal seams.


26. Install gasket onto crankcase first.


27. Insure that the starter gear is installed with the small gear facing out. Put the Pin that the gears ride on into
the motor case. Verify that the two locating dowel pins of the side cover are in place in either the case or
the cover. If the dowel pins are loose in the cover, install them into the case 1st. See Figure 17.

picture.php
 
Installation and Review: Mountain Performance Inc, Stage 1 Supercharer (Part 3)

28. Put the PTO extension shaft through the hole in the side cover. The PTO will not be bolted until the cover is installed. Small PTO end is outside, big PTO end is inside.

29. KEEP A HOLD OF THE PTO END; don’t let it fall inside as you are installing the cover. Reinstall the PTO cover. The shaft for the starter gear, the dowels and the wires must all be correct for the cover to snap flat against the motor case. DO NOT FORCE THE COVER; it will drop into place when everything is correct.
Note: DO NOT PUSH ON COVER!
Note: The magnet will try and pull the cover from your hands – seal / shaft alignment is critical.
Note: Don’t pinch stator wires (or fingers) between cover and case.


Like taking it off, putting it back in place took a bit of "finagling"...
Not sure if there is some better way to do this, but I just had to work it back and forth until it just more or loss popped into position. Once everything was lined up properly it just pulled itself closed with the magnet doing most of the work.
picture.php
 
30. Reinstall 12 OEM Allen Head Bolts noting original location of the wire clip. You must coat the threads of the short black bolt with a small amount of 3M Semi-drying 1103 or Semi-drying Yamabond 1215 (silicone
will work in a pinch). Torque to 9 ft-lbs.


All the bolts back in place and ready to be torqued down.
picture.php


But of course I forgot to install the stator wire clip on the first go around.
picture.php
 
31. Install the PTO / Crank Bolt:

B. Install new longer bolt without any washer, and OEM wire inside new bolt. Just start the bolt, don’t tighten. Insure that the pilot on the PTO extension shaft goes inside the flywheel bore.

C. Rotate the PTO shaft extension until the dowel pin falls into the flywheel keyway (as you practiced earlier). Verify that the mark you put on the PTO end is in the 12:00 o’clock position. THE SHAFT MUST BE FLAT AGAINST THE FLYWHEEL WITH THE PIN INSTALLED CORRECTLY OR EXTREME DAMAGE WILL BE CAUSED. Once the shaft is in place and held against the crank end, carefully tighten the bolt.

D. Lock primary clutch with long shaft (like pry bar or primary holder). See Figure 18.

E. Torque new bolt to 94 ft-lbs.


PTO Shaft in place and bolt inserted.
picture.php


Primary clutch securely locked with a pry bar.
picture.php


Torque Away!
Of course, this is when I discovered that the new Torque Wrench I bought for this project only went to 80ft lbs and not the 100 that it advertised.
picture.php
 
32. VERY IMPORTANT!! Lube new PTO seal and PTO shaft with light coating of engine oil.

Lubing the PTO Shaft
picture.php


picture.php
 
33. Verify that the o-ring is in place on the PTO seal housing. BE VERY CAREFUL TO NOT DAMAGE PTO SEAL WITH PTO SHAFT. Thread the seal into the cover and torque to about 20 ft-lbs. See Figure 19.


The PTO Shaft Seal.
picture.php


Screws right in with no trouble at all.
picture.php


And of course I find out that I need another tool that I don't have on hand to tighten down this seal. So this ends tonight's progress.

picture.php
 
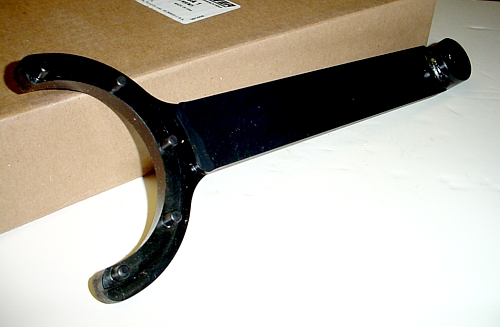
So, whats the correct name of the tool I need to tighten down that seal.?

I know what it looks like, but for the life of me I can't remember it's name??
 
Christopher,

Do you have the Yamaha Master Service Manual for your sled? The one the dealer sells? I would think it would give the tool name and maybe even a Yamaha part number for it. I know on some of the other items I have worked on any more unique tools like that had that info in the Service Manual.
 
OTC Tools & Equipment (SPX) 6613 Variable Pin Spanner Wrench

OTC makes good stuff and this is only about $40 on Amazon. I don't know if anyone local would have one but Napa and others can usually order OTC stuff in for you.

Is there a torque spec on there for this or just tighten it down. If you want to torque it then you would have to fine a socket specifically the same size. I would get some loctite and put it in and tighten it down with one of these adjustable ones. The seal represents the important portion of that unit and the torque has no effect upon it unless you go hero on the torque and distort the insert.
 
Installation and Review: Mountain Performance Inc, Stage 1 Supercharer (Part 3)

Spec says to torque to "About 20lbs"
 
Last edited:
Premium Features


Back
Top