Install the app
How to install the app on iOS

Follow along with the video below to see how to install our site as a web app on your home screen.

Note: This feature may not be available in some browsers.

  • Don't miss out on all the fun! Register on our forums to post and have added features! Membership levels include a FREE membership tier.

I finished my summer project D-8T

Does anyone make a muffler for the Areocharger???? PM me.

TIA :beer;

Yes OVS/Pure Logic 801-791-0403
I have a used one from a #66 turbo Dragon with the correct flange and 0/2 bung $200
 
Last edited:
KAWGRN.

Good post... lots of good info here.

a couple of questions that I hope you can take a few minutes to answer.
My sled is gettin the same track this week and I could use some accurate info.

1) Which driver and how many teeth did you go with?

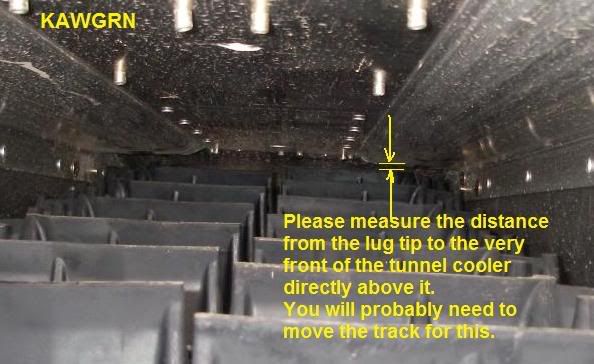
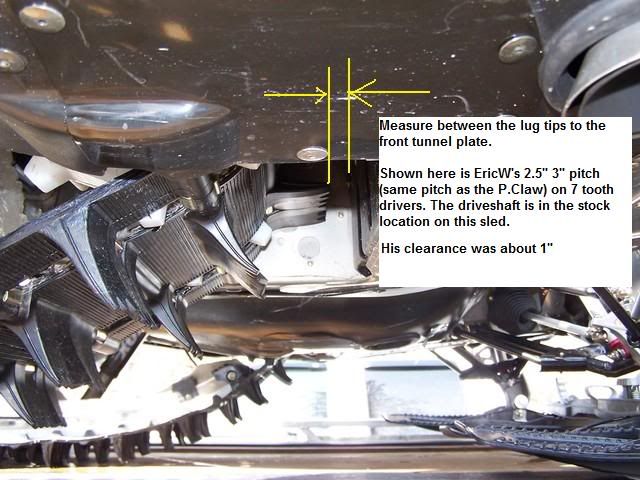
2) Can you have a look at the 2 photos below and take some accurate measurements... the one up the tunnel is the most diffucult one and sometimes pieces of 1/4" plywood stacked can help with this measuremet.

Thanks for your help.
MH

track-1.jpg


frontoftunnel.jpg
 
Last edited:
Ok heres what I did I took a machinist rule and jamed it through the track at the heat exchanger and looked down the tunnel with a light and its between a half and threequarters of an inch on top ( remember Im old and blind)and the front its easily over threequarters . I am using the SLP 8 tooth drivers as I mentioned I was thinking of the 7T but was afraid of the aproach angle,,,,with the ts rear being coupled, I didnt see the need for avids. I think there is plenty of track clean out for where I ride ,,but youi guys in WA and ID get a heavier wetter snow ,Ive been there!!! but colorado I could sometimes use a leaf blower on the front of my sled! !!I still dont see the need for a D+R with the current clearence,,,, But I could be wrong!! and how will I know>???? last season I never had any build up around the drivers. And the 3.0 pitch seem to pull around the suspension soooo much easier ,,,,also IMO dont get the exchaust exiting in the tunnel ,,it worked good untill your stuck then your digging the track clear just to get the turbo to clean out.. Behind the A arms and shock breaks up the snow around the exchaust outlet!! BTDT
 
Last edited:
those pretty much the exact same measurments i came up with so your eyes must be good or mine are bad too:)
 
kinzer,, what do you think??? I think thats enough clearance mabe not !!!more would be better but I think more attack angle would be worse !! its a trade off and D+R would probably be better but thats a lot of work not really shure I keeping this sled yet!I noticed from your pics that your rear suspension arms are both in the front holes I thought Alan wanted only the front arm in the front hole I havent ridden a TS rear yet so Inquiring minds want to know?? your at 12-14 psi right??
 
Last edited:
Thank you for checking guys... VERY MUCH!!

Good to know the real world measurements.

For those that are reading this... we are talking about the Arctic Cat 3" pitch, 153" long Power Claw, 2.25" tall lug tracks. Both Jkinzer and KAWGRN are running the 8 tooth, 3" pitch PPD drivers (avail from SLP, Whal Bros, and Carls). These are standard style, involute drivers and are very cost effective [$140/pair]

With the 8-Tooth, 3" pitch drivers in there and single ply track.... 5/8 of an inch clearance at the top 3/4" at the front (on a dragon with no front cooler).... not bad.

The 7 tooth, 3" pitch should give me just under 1/2" (.48') more clearance all around than the 8 tooth 3" pitch.

If I can get this 1.125" at the top and 1.25 at the front of the tunnel, I'll be VERY happy!

My only concern here is, how close the inside of the track will come to the upper cross tube of the front swing arm with the 7 tooth 3" pitch bringing the inside of the track a little more than 1/4" (.28) closer to this top tube. HMMM...

Also, my angle of attack with this smaller diameter driver (.28" smaller) than the stock 2.86" pitch 8 tooth Polaris driver will be just a hair steeper. I'll have to see what this does for my setup.

With the turbos, you guys shouldn't notice a whold lot of drag unless you were riding in very deep high moisture snow (like we get on the coast)

I'm working with Robbie at Avid right now to come up with a 7 tooth driver that is compatible with the slightly different drive nub arrangement on the Arctic Cat Power Claw tracks.... I'll keep you in the loop.
 
Last edited:
kinzer,, what do you think??? I think thats enough clearance mabe not !!!more would be better but I think more attack angle would be worse !! its a trade off and D+R would probably be better but thats a lot of work not really shure I keeping this sled yet!I noticed from your pics that your rear suspension arms are both in the front holes I thought Alan wanted only the front arm in the front hole I havent ridden a TS rear yet so Inquiring minds want to know?? your at 12-14 psi right??

Allen set the skid up himself and installed it on my sled, gave me the propper psi to run in the socks as a starting point and said give her hell. they have a tuning sheet on the website which will come in hadny getting it dialed in, but he said for my style of riding at 12-14lbs of boost it should work better with both mounts in the front holes, 60ish psi in the front shock, a half inch slide spacer, and around 130ish in the rear shock. the less air you can have in the shocks with out bottoming them out the better, this will allow the skid to suck up into the tunnel as the weight transfers and keep the sled up ontop of the snow and help keep it from trenching. hope that made since.. i cant wait to get it on the snow... there are a ton of limiter strap settings... and plan on spending the first couple good snow days getting the skid dialed in... COME ON SNOW!
 
Last edited:
Here is the adjustment and set up spec sheet for the 2010 timbersled suspension

Understand How the Mtn. Tamer Suspension Works:
The biggest benefits of the Mtn. Tamer design is that it puts even pressure on the snow between the front and back portion of the suspension. This is achieved by our rear arm slide mechanism and the mounting position of the shocks. The slide mechanism couples the back portion of the suspension to the front at a specific spot in the range of travel. At this point the suspension will travel straight up into the tunnel, reduce the track angle, and applying the sleds weight toward the front, pulling it on top of the snow.
Knowing the 5 Adjustment Points on the Suspension: Limiter Strap: The limiter straps are only adjustable from one end (the top). The lower end must be fastened around the limiter strap cross shaft and in-between the 3 alignment spacers. The strap has 10 adjustment holes in the middle of the strap. At the top end of the strap there are 2 other holes to choose from. The hole that is closest to the end of the strap is the standard adjusting hole. The hole that is 3” down from the end of the strap is an optional hole that will give the strap 10 coarser adjustments (works well on high-horse power sleds). Optional Shock Mounting Locations: If you are using Timbersled slide rails, they will have 2 optional mounting locations for the front and back shock. The rearward holes are the standard mounting location; they will work the best for all around boondocking and deep powder riding. The forward holes will make the suspension 30% stiffer and more bottom-out resistant, they work well for larger riders and making more affective adjustments on turbo charged sleds. Float Shock Air Pressure: Note: In your installation instructions are recommended air pressure set-ups for each sled brand and rider weight. Your kit includes an air pump to adjust the spring rate of the shock. To do this, lift up the back end of the sled, remove the silver air valve-cap (be very careful that you do not get any moisture inside the air valve). Thread the pump onto the valve-stem until you feel the pump pressure up, you will be able to see the pressure on the gauge. Also keep in mind that when the pump pressures up the shock looses 4 psi. When you unthread the pump you will hear it release air but will not affect the exact pressure you gave it. When tuning your suspension it is best to change air pressure in increments of 10 psi at a time. The Mtn. Tamer shocks have specific air pressure range that they must run in so that you do not damage the suspension (depending on the hole location in the rails). Shock Pressure Ranges: Front shock in front hole, 40 to 80 psi Front shock in back hole, 75 to 100 psi Back shock in front hole, 120 to 175 psi Back shock in back hole, 130 to 175 psi
Warning: If your suspension is bottoming out you need to stop and readjust. If you are unable to make the shocks
perform properly you need to stop riding and contact us for assistance. Damage will occur if you ignore the problem. Back Arm Slide Mechanism: The slide mechanism has 2 adjustment points by adding or removing aluminum shims that are included in the kit.
1st you can adjust the sleds rear ride height by adding a shim onto the top side of the slide mechanism. This works well for fine tuning the amount of ski pressure your sled has on the trail without jeopardizing the amount of ski lift when climbing.
2nd you can adjust how much suspension couples by adding a shim to the bottom side of the slide mechanism. In conjunction with the limiter strap, this controls how much ski lift your sled will have.
Each sled brand has a max amount of shim you can add to the slide mechanism; if it is over shimmed the suspension will bind up. Max Shim for each sled Brand: Arctic Cat M-Series, ½” top ~ ¼” bottom Polaris IQ & Edge, ½” top ~ ¾” bottom Ski-Doo REV, ½” top ~ ¾” bottom Ski-Doo XP, ½” top ~ ½” bottom Yamaha (all), ½” top ~ ¾” bottom
Warning: Never exceed the max amount of shim that is recommended for your sled brand. Damage will occur if you do.
Recommended Set -Ups : Page 2 of 2
The given set-ups are intended to control ski lift and have been tested by Timbersled on various types of sleds. They are a good starting point to go by; however, every rider has a different liking and will need to fine tune the suspension from these set-up points.
Warning: The Mtn. Tamer is a high performance mountain sled back suspension. It has the ability to make extreme amounts of adjustments to the point of damaging results. The listed tuning set ups are universal. Know the limits of adjustability for your sled brand. There is no warranty on damage that is caused by tuning results. Normally Aspirated Sleds Slide shims: No shim on bottom & no shim on top (Up to 175 HP) Front shock: Middle to upper range of air pressures in rearward hole
Back shock: Lower to middle range of air pressures in rearward hole
Limiter strap: 3rd to 6th hole down, using standard end hole on strap
Turbo Sleds,6-12 psi of boost Slide shims: ½” shim on bottom & no shim on top (Up to 225 HP) Front shock: Lower to Middle range of air pressures in rearward hole
Back shock: Middle to upper range of air pressures in rearward hole
Limiter strap: 6th to 8th hole down, using standard end hole on strap
Turbo Sleds, 12 - 16 psi of boost Slide shims: ½” to ¾” shim on bottom & ¼” shim on top (Up to 250 HP) Front shock: Lower to Middle range of air pressures in forward hole
Back shock: Upper range of air pressures in rearward hole
Limiter strap: 5th hole down, using optional end hole on strap
Turbo Sleds, 16 - 20 psi of boost (162 - 174” track is mandatory to control this amount of power) (Up to 310 HP) Slide shims: ¾” shim on bottom & ¼” to ½” shim on top
Front shock: Lower range of air pressures in forward hole
Back shock: Middle to upper range of air pressures in forward hole
Limiter strap: 7th to 10th hole down, using optional end hole on strap
Turbo Sleds, 20 - 25 psi of boost (174” track is mandatory to control this amount of power) (Up to 375 HP) Slide shims: ¾” shim on bottom & ½” shim on top
Front shock: Lowest range of air pressures in forward hole
Back shock: Middle to upper range of air pressures in forward hole
Limiter strap: 10th hole down, using optional end hole on strap
______________________________________________________________________________________
 
Timbersled Mountain Tamer for an IQ RMK

Jeremy,

You sled looks sick and the color scheme/graphics are an original.

Thanks for posting up all of the information and pics so everybody can drool and appreciate your hard work at the same time..

The Timbersled skid/A-arms look awesome and should make a huge difference in the handling. My order was placed last week for a Mountain Tamer so I have been watching your build with a lot of interest.

Good work by everybody who helped on your sled.:beer;

akrevrider
 
So you think the exhaust exiting the shock tower is a good thing? I have the OVS set-up and everytime I get it deep snow it falls on it's face.
 
So you think the exhaust exiting the shock tower is a good thing? I have the OVS set-up and everytime I get it deep snow it falls on it's face.
I had noticed a previous post from you on this in the past and personally on my BD kit with the tunnel dump I've never had a problem. So I was kinda wondering the same thing.


??????
 
second that, i've never had an issue with powder bog at all, the tunnel dump has worked flawlessly since day one, i did have to make a little bracket to keep the exhaust from going down the side of my tunnel tho
 
Im just the oposite I also Have the OVS kit -Had a boondocker before and I find the shocktower dump works better for me but I think the guys in the WA and western slopes have a heaver wetter snow When I had My tunnel dump it always bogged when I stopped and I had a hard time getting going worked Ok as long as Iwas moving
 
So you think the exhaust exiting the shock tower is a good thing? I have the OVS set-up and everytime I get it deep snow it falls on it's face.

Are you running the 3 inch out let???? and whats the cut on the end of the pipe it really made a difference when I cut the end at a slight angle back.and are you running a race pipe or the stock one???pretty soon all our sleds will look like mud buggys with snorkels for intake and exchast 5 feet up
 
Last edited:
Are you running the 3 inch out let???? and whats the cut on the end of the pipe it really made a difference when I cut the end at a slight angle back.and are you running a race pipe or the stock one???pretty soon all our sleds will look like mud buggys with snorkels for intake and exchast 5 feet up

I believe it is the 3" outlet, it is the one that came with the OVS kit. The end of the pipe is cut square/flat.......you think cutting it back at an angle helps? And I am running the stock pipe but am going to run the SLP pipe this year. You think that makes a difference too?? I was actually thinking about running the exhust out the stock outlet instead......I am open to suggestions.
 
I could see an angled cut working toward your advantage with the leading edge of the pipe "cuting through the snow and creating an air cavity behind for the exhaust.

Kind of like a deflector on a standard "out the bottom" exhaust. I had a friend that ran tripple pipes on a Viper and every time he jumped into powder it would fall on it's face. We put a deflector in front of the pipe outlet to create a trough as it went through the snow and it made a huge difference.
 
Nice job Kawgrn!!

I really like the powdercoating touches and clean install of the parts.

The front and rear suspension setup/shocks/track is is on mine for this year.

Did you go with the HCR track?

7 tooth or 8 tooth drivers (Avid or SLP?)

Whose turbo is that?

Use the A/F O2 sensor for tuning.... don't leave it in the exhaust...

Even though many do, they are not getting accurate A/F readings over time... the sensors are not designed to tolerate oil in the exhaust and give inaccurate info.

I spoke with the engineers at Bosch (they make the O2 sensors for AEM, KOSO, Innovate etc)... It is a fact that these will not provide accurate information, on a 2-stroke, if left in the exhaust stream.
4-strokes, yes... 2-strokes, no. An EGT gauge should be included in your setup....IMO.

if you use a NTK LSU sensor you could use it all day long ;)

or the best, L1H1/L2H2 sensor with a good wideband controler
 
couldnt find a way to get the pics coppied to my for sale so had to bring this to the top $12900
 
Last edited:
Premium Features


Back
Top