6
600xc4me
Well-known member
Before I even start, I want to say that this is just my experience installing this kit, and my instructions or methods shouldn't be used in place of the supplied Holz ones. This is just how I did it. When I was in the process of buying the kit I was asked to share my experience installing it, with you. In case there are others interested in the kit I agreed it might be helpful. So here it is. There are lots of pics, so you might have to give your browser a minute or two. I'm sorry they are such poor quality... 
Well. I finally got the Holz drop and roll installed into my 08 800 dragon. I didn't keep track of hours as I did it over a month as I had time, but I would guess it took me a good 30-35 hours. My first time pulling my sled apart in this area, Doing it alone, taking my time. It could be done a lot faster I'm sure.
The kit drops your jack shaft, and lower drive shaft 5/8 of an inch, for more tunnel clearance, as well as better track approach angle.
Special tools needed are: An angle drill, I used this style, a small air one would be best.

-You will need a die grinder, with a cutting wheel, as well as a normal grinding bit.
-Hole saws, 2 1/4, and 3 3/8 (I used three inch)
-Plus all your normal tools. Other cutting tools might work as well, but again this is just what I used. Being 17 and not having all the tools already I had to go out and buy about eighty bucks worth of tools for this project. If you have a nice full set of tools you should have everything needed.
Packaging. For most part the kit was well packed, could have had more protection, but there isn't much that can break in the box. I thought it was fine as it was.

Once unpacked the kit looked very nice, well machined and strong. Good quality stuff in my opinion.

-First step is removing the rear suspension, I won't go into that as I'm sure anyone who is thinking of a D&R knows how that works.
-Second would be removing the track. I started by draining the chain case oil. Here:

I also like to kinda go through the old oil a bit, with a magnet, just looking for any pieces of steel that might indicate a damaged chain.
-I then pulled the chain case cover, six small bolts. Some oil will run out so maybe keep a rag handy.
-Next remove both sprockets, chain, tensioner, brake pads, and brake rotor.(I had to loosen the two bolts holding the chassis side brace in place to get the clearance I needed to pull it free)

-You can then remove the chain case itself. Four nuts. It won't want to come completely off yet, so just slide it off as far as possible for now.

-Next you'll want to pull the drive shaft. To do so remove the speedo plug from the housing, then the six nuts on the inside of the bulk head. Three hold the speedo cup in place, and three are for the bearing flange on the inside of the tunnel.

-Slide the drive shaft over through the hole once you have the speedo cup off, once the mag side is out of the chain case you can lower that side, then pull the other side out down at an angle. Your track is now free. You should also be able to completely remove the chain case now.
-Next is the air box, once it's out you can remove the three bolts keeping the jack shaft in, and remove it.

Now your ready to start the actual drop and roll.")
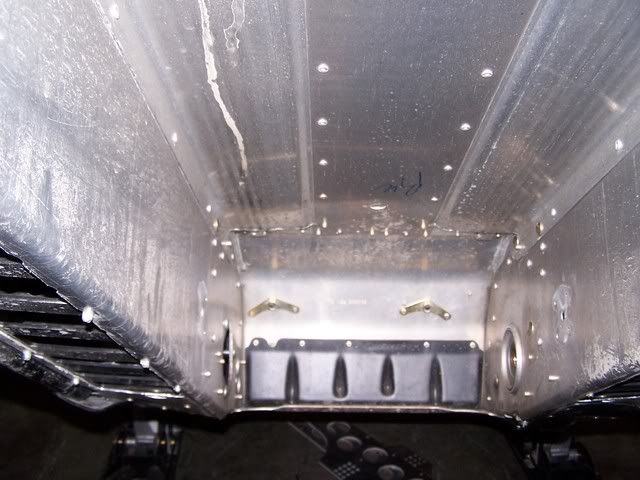
-Install the left side plate over top the jack shaft/drive shaft holes, the plate has half moon circles machined into it, the plate should fit so those half moons are in your stock shaft holes. Drill the bulk head for rivets, using the predrilled holes in the HRP plate at a guide. Rivet the plate in place. Should look something like this.

-Take your 2 1/4" hole saw and cut in your new jack shaft hole using the hole in HRP plate as your guide again.

-Now using your angle drill, drill out the six 5/16 holes for the bearing flanges, (jack shaft and lower drive shaft) Once again use the HRP plate as a guide. (see above pic) Any holes you have to drill into your bulk head are all pre-drilled in the plate.
-Next trim the bulk head by the drive shaft hole down to match the HRP plate. I used a die grinder, took a while and made a mess but made a nice job of it. This side is done once you have that completed.

-So moving to the right hand side, first remove all the stock rivets holding your plastics/stock steel guard in place on the bottom side. (you don't have to completely remove the plastics) Remove the steel guard.
-You can then cut out the hole for the HRP chain case guard. You want to measure about 1/4 inch from the bottom of the foot rest, going forward 7 3/8", and out 4 3/4 inch. Careful you don't make it to big. You don't want snow coming in through there later on. I used a cordless reciprocating saw, and the die grinder with cutting wheel for this one. You'll also want to cut the stock steel plate to match this hole. Just hold in place, mark off, remove, and cut to fit.

-Next install the HRP template using the stock chain case bolts, and tighten. (sorry I don't have any pics of the plate installed) Drill 3/16 pilot holes for the new chain case mounting location. Use the plate as your guide. You will need the angle drill here again.
-Now drill out the lower drive shaft hole using the 3 3/8 hole saw, (with angle drill) Use the guide hole in the plate. if you can't get a 3 3/8 hole saw use a 3 inch. Then carve the rest out with the die grinder later on. (the picture here is a bit ahead of the game, but it shows the modified drive shaft hole)

-Before removing the plate make sure to mark the bulk head by the jack shaft area. The HRP plate has a U shape up there, just trace that line onto the bulkhead. You will need it later on to make room for the brake rotor.
-Now you can take off the plate, and drill out the chain case mounting holes to 3/8".
- Remove the pictured rivet. It's in the way to mount the HRP case guard. Which comes later. I used the angle drill. An air hammer would also work well.

-Since I only had the 3 inch hole saw, I now used the die grinder to enlarge the lower drive shaft hole till the chain case fit properly.

-Rivet the HRP chain case guard, and the stock steel guard into place. See three pictures up for how to place it.
-Next I filed the four chain case mounting holes so they were square. Using a three sided file. Three sided or square files will both work.
-Now you'll want to press the bearing off of the jack shaft, (replace if needed or if it's got fairly high miles) Install the .21 spacer (the bigger one) over shaft, and reinstall the bearing.
-Next comes modifying the bulk head so the brake rotor will fit. This one had me stumped for some time. First using the die grinder with cutting wheel, I cut out most of the weld that is on the inside of the tunnel, leaving about 1/4 inch of the weld intact on both ends. I cut from the top of the tunnel, going down. Once the cut is long enough pound/bend down the top part of the tunnel till it looks like it's down to about where you made the U shape on the bulk head. I then bent the remaining vertical piece of the bulk head in, to close the gap and finish off the edge. The bent in part was a bit long, so I used the die grinder with cutting wheel, to cut about half off, then bent it in a bit tighter. It now starts looking somewhat like this.


I used a small punch to get the bent over part, pounded thin enough to sort of blend in with the top part of the bulk head, which it's bent onto. I used a file to clean up the whole surface a bit till it looked something like this.

-Now you install the jack shaft using the one supplied HRP bearing flange, and one stock one, (why, I'm not sure, they look the same) Both flanges need to be on the outside of the bulkhead, they won't fit any other way anyway. Install the three bolts, but don't tighten yet.
-I then installed the brake rotor and chain case to see if what I did to the bulk head provided the brake rotor enough room to spin freely. It didn't, so I filed a bit till it was able to spin freely. If your not sure where the rotor is touching the bulk head, put a smear of grease on the rotor, and spin it a few times. Remove, and you should have a pretty good idea on where you need to trim. You can now also install the lower driveshaft, (NO TRACK YET) to see if it spins freely. Before doing so, install the supplied .078 spacer over the drive shaft on the splined, gear end. To make up for the offset of the HRP plate on the left hand side. Use the supplied bolts when installing the speedo housing, and stock hardware for the bearing flange. If all spins freely you can start putting er back together.
A few finish pics.


I hope I didn't miss any important points, if I did let me know and I'll see if I can fix it.
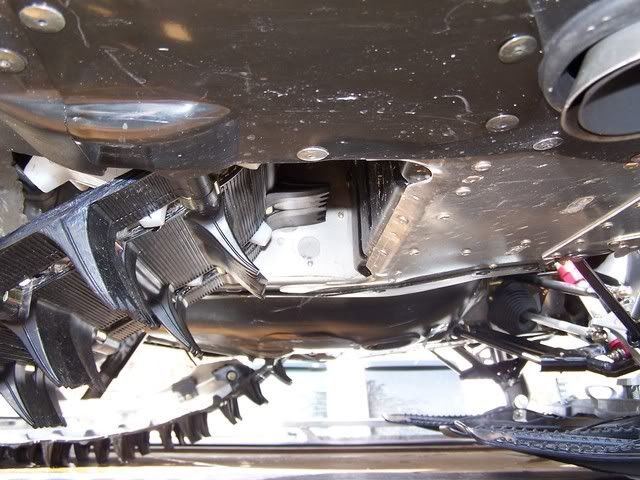
This is how mine currently sits. I'm waiting on my Challenger Extreme before final assembly. But from here on it should be like putting a stock sled back together.
Thanks to MountainHorse, and Holz and a few other members for the help with this, and recommending me to this kit. Over all the install went very smoothly considering it was my first time doing anything like this. Any questions or comments just post up and I'll try to answer them as best I can.
600xc.
Well. I finally got the Holz drop and roll installed into my 08 800 dragon. I didn't keep track of hours as I did it over a month as I had time, but I would guess it took me a good 30-35 hours. My first time pulling my sled apart in this area, Doing it alone, taking my time. It could be done a lot faster I'm sure.
The kit drops your jack shaft, and lower drive shaft 5/8 of an inch, for more tunnel clearance, as well as better track approach angle.
Special tools needed are: An angle drill, I used this style, a small air one would be best.
-You will need a die grinder, with a cutting wheel, as well as a normal grinding bit.
-Hole saws, 2 1/4, and 3 3/8 (I used three inch)
-Plus all your normal tools. Other cutting tools might work as well, but again this is just what I used. Being 17 and not having all the tools already I had to go out and buy about eighty bucks worth of tools for this project. If you have a nice full set of tools you should have everything needed.
Packaging. For most part the kit was well packed, could have had more protection, but there isn't much that can break in the box. I thought it was fine as it was.
Once unpacked the kit looked very nice, well machined and strong. Good quality stuff in my opinion.
-First step is removing the rear suspension, I won't go into that as I'm sure anyone who is thinking of a D&R knows how that works.
-Second would be removing the track. I started by draining the chain case oil. Here:
I also like to kinda go through the old oil a bit, with a magnet, just looking for any pieces of steel that might indicate a damaged chain.
-I then pulled the chain case cover, six small bolts. Some oil will run out so maybe keep a rag handy.
-Next remove both sprockets, chain, tensioner, brake pads, and brake rotor.(I had to loosen the two bolts holding the chassis side brace in place to get the clearance I needed to pull it free)
-You can then remove the chain case itself. Four nuts. It won't want to come completely off yet, so just slide it off as far as possible for now.
-Next you'll want to pull the drive shaft. To do so remove the speedo plug from the housing, then the six nuts on the inside of the bulk head. Three hold the speedo cup in place, and three are for the bearing flange on the inside of the tunnel.
-Slide the drive shaft over through the hole once you have the speedo cup off, once the mag side is out of the chain case you can lower that side, then pull the other side out down at an angle. Your track is now free. You should also be able to completely remove the chain case now.
-Next is the air box, once it's out you can remove the three bolts keeping the jack shaft in, and remove it.
Now your ready to start the actual drop and roll.
-Install the left side plate over top the jack shaft/drive shaft holes, the plate has half moon circles machined into it, the plate should fit so those half moons are in your stock shaft holes. Drill the bulk head for rivets, using the predrilled holes in the HRP plate at a guide. Rivet the plate in place. Should look something like this.
-Take your 2 1/4" hole saw and cut in your new jack shaft hole using the hole in HRP plate as your guide again.
-Now using your angle drill, drill out the six 5/16 holes for the bearing flanges, (jack shaft and lower drive shaft) Once again use the HRP plate as a guide. (see above pic) Any holes you have to drill into your bulk head are all pre-drilled in the plate.
-Next trim the bulk head by the drive shaft hole down to match the HRP plate. I used a die grinder, took a while and made a mess but made a nice job of it. This side is done once you have that completed.
-So moving to the right hand side, first remove all the stock rivets holding your plastics/stock steel guard in place on the bottom side. (you don't have to completely remove the plastics) Remove the steel guard.
-You can then cut out the hole for the HRP chain case guard. You want to measure about 1/4 inch from the bottom of the foot rest, going forward 7 3/8", and out 4 3/4 inch. Careful you don't make it to big. You don't want snow coming in through there later on. I used a cordless reciprocating saw, and the die grinder with cutting wheel for this one. You'll also want to cut the stock steel plate to match this hole. Just hold in place, mark off, remove, and cut to fit.
-Next install the HRP template using the stock chain case bolts, and tighten. (sorry I don't have any pics of the plate installed) Drill 3/16 pilot holes for the new chain case mounting location. Use the plate as your guide. You will need the angle drill here again.
-Now drill out the lower drive shaft hole using the 3 3/8 hole saw, (with angle drill) Use the guide hole in the plate. if you can't get a 3 3/8 hole saw use a 3 inch. Then carve the rest out with the die grinder later on. (the picture here is a bit ahead of the game, but it shows the modified drive shaft hole)
-Before removing the plate make sure to mark the bulk head by the jack shaft area. The HRP plate has a U shape up there, just trace that line onto the bulkhead. You will need it later on to make room for the brake rotor.
-Now you can take off the plate, and drill out the chain case mounting holes to 3/8".
- Remove the pictured rivet. It's in the way to mount the HRP case guard. Which comes later. I used the angle drill. An air hammer would also work well.
-Since I only had the 3 inch hole saw, I now used the die grinder to enlarge the lower drive shaft hole till the chain case fit properly.
-Rivet the HRP chain case guard, and the stock steel guard into place. See three pictures up for how to place it.
-Next I filed the four chain case mounting holes so they were square. Using a three sided file. Three sided or square files will both work.
-Now you'll want to press the bearing off of the jack shaft, (replace if needed or if it's got fairly high miles) Install the .21 spacer (the bigger one) over shaft, and reinstall the bearing.
-Next comes modifying the bulk head so the brake rotor will fit. This one had me stumped for some time. First using the die grinder with cutting wheel, I cut out most of the weld that is on the inside of the tunnel, leaving about 1/4 inch of the weld intact on both ends. I cut from the top of the tunnel, going down. Once the cut is long enough pound/bend down the top part of the tunnel till it looks like it's down to about where you made the U shape on the bulk head. I then bent the remaining vertical piece of the bulk head in, to close the gap and finish off the edge. The bent in part was a bit long, so I used the die grinder with cutting wheel, to cut about half off, then bent it in a bit tighter. It now starts looking somewhat like this.
I used a small punch to get the bent over part, pounded thin enough to sort of blend in with the top part of the bulk head, which it's bent onto. I used a file to clean up the whole surface a bit till it looked something like this.
-Now you install the jack shaft using the one supplied HRP bearing flange, and one stock one, (why, I'm not sure, they look the same) Both flanges need to be on the outside of the bulkhead, they won't fit any other way anyway. Install the three bolts, but don't tighten yet.
-I then installed the brake rotor and chain case to see if what I did to the bulk head provided the brake rotor enough room to spin freely. It didn't, so I filed a bit till it was able to spin freely. If your not sure where the rotor is touching the bulk head, put a smear of grease on the rotor, and spin it a few times. Remove, and you should have a pretty good idea on where you need to trim. You can now also install the lower driveshaft, (NO TRACK YET) to see if it spins freely. Before doing so, install the supplied .078 spacer over the drive shaft on the splined, gear end. To make up for the offset of the HRP plate on the left hand side. Use the supplied bolts when installing the speedo housing, and stock hardware for the bearing flange. If all spins freely you can start putting er back together.
A few finish pics.
I hope I didn't miss any important points, if I did let me know and I'll see if I can fix it.
This is how mine currently sits. I'm waiting on my Challenger Extreme before final assembly. But from here on it should be like putting a stock sled back together.
Thanks to MountainHorse, and Holz and a few other members for the help with this, and recommending me to this kit. Over all the install went very smoothly considering it was my first time doing anything like this. Any questions or comments just post up and I'll try to answer them as best I can.
600xc.
Last edited: