Install the app
How to install the app on iOS

Follow along with the video below to see how to install our site as a web app on your home screen.

Note: This feature may not be available in some browsers.

  • Don't miss out on all the fun! Register on our forums to post and have added features! Membership levels include a FREE membership tier.

BDX Bumper Cracking Tunnel

M-Niner,

You got the wrong VE piece. They made a new piece that allows you to cut the horizontal portion of the stock running boards off just like the BDX bumper. The end cap is very similar to your version. There is a pic of it in an earlier post on this thread.


I went this route when I did mine. I also incorporated the BDX foot supports. In total it was a little more expensive than the BDX kit but, much, much stronger.

I trimmed the end of my tunnel to allow the VE bumper to extend over the rivets for the front portion of the tunnel that go thru the suspension support bracket. So, essentially my bumper connects to the bracket via 6 rivets and also ties the tail section to the front tunnel section. Very strong IMO. Oh, and it allows the rear of the tunnel to cut through the snow like butter. I can't tell you how many times I haven't gotten stuck this season just because of this bumper mod. It just keeps cutting down to firmer snow layers. And I didn't think that my M7 could get any better.....................

Here is the best pic of it I could find (Crater Lake just after X-mas of 08)

b_141912.jpg

Now I see. 1st I've seen of that design. Looks like a better design and easier install. Sweet pics.
 
maybe installing the kit in 20 minutes is not the way to do it??? i know i spent a few hours installing mine, but then i'm very anal about being perfect with my cuts!!! have of 3,000 miles on mine, stuck, towing its done it all. looked it over very closely yesterday and could not see any problem. will be making a plate this summer to go from the kickup to the end of the bumper inside the tunnel for extra support just incase...
 
Used a Sno bunje on mine multiple times and the only cracking I have had is around the cooler which I installed the 09 End cap to solve that problem. But after seeing some of these pics I will be reinforcing mine.
 
will be making a plate this summer to go from the kickup to the end of the bumper inside the tunnel for extra support just incase...
I made my own bumper last summer. When I finished I noticed the sides bowed out when I pushed down on the back. I cut some pieces of 1/8 alluminum plate and riveted them where it was flexing. Problem solved. It made it incredibly sturdy.
 
maybe installing the kit in 20 minutes is not the way to do it??? i know i spent a few hours installing mine, but then i'm very anal about being perfect with my cuts!!! have of 3,000 miles on mine, stuck, towing its done it all. looked it over very closely yesterday and could not see any problem. will be making a plate this summer to go from the kickup to the end of the bumper inside the tunnel for extra support just incase...

agree...looked at mine..all ok...but will build a plate anyway....for towing i will rig something up (telescopic and strong) to go through the back gas can hold down hoops and tow from there each side outward bound of the tunnel
 
gas rack

Id becareful about pulling from there I dragged out a buddys 1m and I had the rear tunnel bend down.Before I ran the ve I had a ve on there that I cut down right behind the kickups and it bent so I bought a another ve rear tunnel and did it the right way costly mistake.But mike is a great guy and Im sure he will come up with a fix by the way does anyone want to buy an 09 endcap i bought it and dont need it
 
I installed mine just as the instructions said and everything was tight and fit perfect. Well designed kit as far as ease of install and looks, but it still tore my tunnel and cost me alot of money to fix it right. Sure you can bend it back down and build plates and weld the cooler lines. BUT i like my stuff to be right so when i trade or sell it it doesn't look like something that came from a salvage yard. if the kit would have been used hard and tested before being released maybe the problem could have been avoided. Just my 2 cents! :face-icon-small-sad
 
I'm fixing a freinds BDX setup M this week with this problem... he had a VERY hard tail landing that would have bent anything anyway.

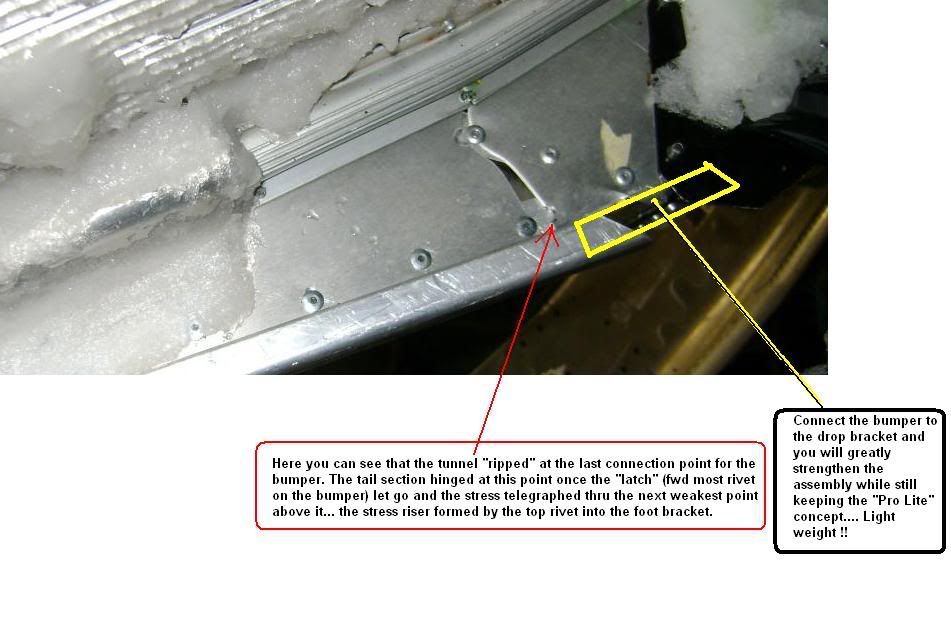
Here is my take on the situation, IMO

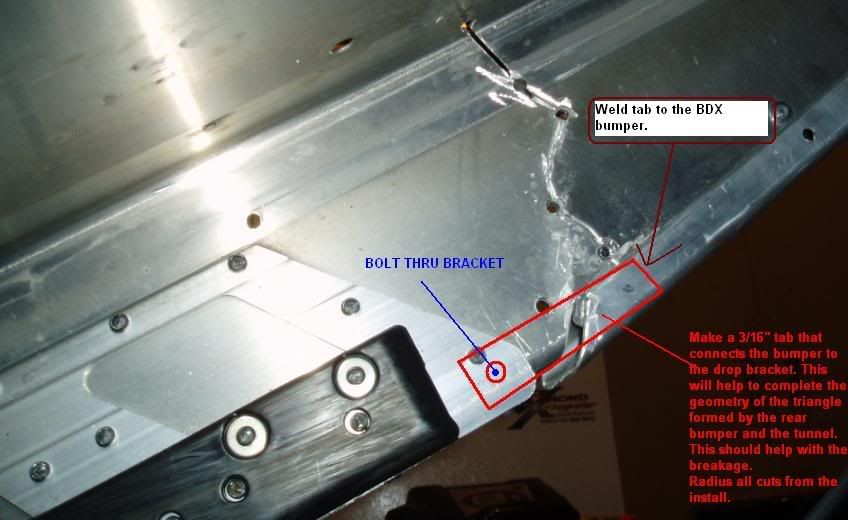
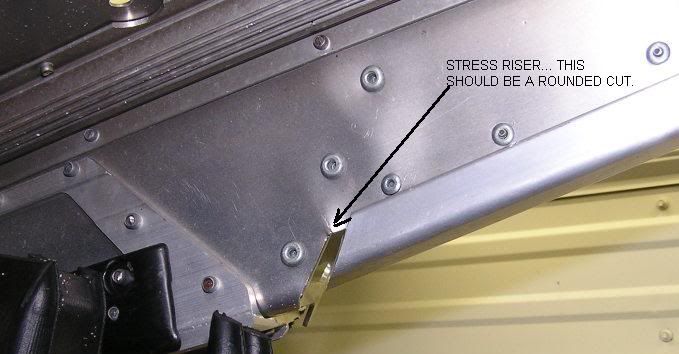
A couple of observations... the install is critical when making cuts and making sure to leave no corners... all cuts should be radiused.

The rivets for the running board supports... also stress risers but needed. I will be replacing these with Stainless grade 8 Fine thread button head cap screws with back up 'crush' nuts and red locktite for a very secure connection and make sure the holes in the tunnel are clean and burr free.

Lastly, I will be adding on a tab to the bumper that connects it to the drop bracket so that it connects the bumper to the drop bracket.

IMO, the concept of the BDX bumper is to drop weight from the sled. I want to keep this as simple as possible and still have a strong setup that is light as possible.

We are replacing the rear tunnel section and the coolers as they got truly pooched in the landing.

I will also be using Structrual rivets in all of the fastening. DEFINATELY won't be using any standard pop rivets as I feel they are not strong enough. Minumum should be high strenght steel or HS stainless rivets.

Also, grip range for the rivets is crucial. If the grip range is not correct you will be strictly relying on the rivet body to handle the shear loads on it rather than the material around the rivet when proper clamping forces are attained that help distribute the load (look at the previous pics that "connect the dots" between the rivets on the running board supports.

Ultra-Grip rivets offer high strength, wide grip range, and excellent clamp-up force.
This system provides a mechanical lock that delivers 100% mandrel retention.
The mandrel also fills the body of the rivet to give greater shear strength.

http://www.hansonrivet.com/w24.htm

bdxbracket.jpg


Here is a good rivet guide.
http://www.hansonrivet.com/w13.htm

stressriser2.jpg


STRESSRISER.jpg
 
Last edited:
VE Bumper

I installed the VE bumper over my cracked tunnel and it is a great solution to the BDX problem.

It took about 4 hrs to install and the work was worth it. The bumper is much better for lifting and the overall strength of the tunnel is greatly improved.

I applied a sandwich patch to either side and hopefully the cracking has stopped!
 
Mountainhorse- for a kit that cost $200+ dollars you would think that it should work the first time. I shouldn't have to weld tabs and radius cuts. The radius cut thing is a crock of **** in my opinion! If that is what i need to do to make it last maybe two more rides than i think there is a problem in development. THE KIT WASN"T BUILT RIGHT! plan and simple.
 
I hear ya about it being right from the start... I'm sure that Mike is really looking into this and that he will back up his product...

But... the radius on the cut makes a WORLD of difference in how things break.
 
I hear ya about it being right from the start... I'm sure that Mike is really looking into this and that he will back up his product...

But... the radius on the cut makes a WORLD of difference in how things break.

yep it only takes a sec to round out...won;t hurt but will still be a problem area
 
Radius corner ... a 'WORLD' of difference?? Then how do you explain some or most of them are failing at the front bumper rivet.

Still a p*ss poor design in my book.

I should at least get my money back, let alone my additional expenses to fix the tunnel, etc... but I'm not counting on it. :mad:
 
the other side

DSC01181.jpg

i have to admit...your are a bright and handy snot sucker....:beer;:beer;

this is the bracket that bdx should look at..i have a local shop that has a shear/bender so do-able easily
but as well if bdx came up with a good end all great fix i would consider covering some cost...shipping etc as it could be a fair
bit of coin for a small outfit
 
Last edited:
Last summer/fall when we were all doing this mod, everyone said. "The BDX kit was WAY STRONGER then the Cat rear bumper. The Cat bumper is weak! and is going to bend."

Now all I have to say is "THAT SUCKS DUDE! YOUR BUMPER KIT IS WEAK!":D:beer;

I hope you guys find a fix for your broken tunnels.
 
Radius corner ... a 'WORLD' of difference?? Then how do you explain some or most of them are failing at the front bumper rivet.

Still a p*ss poor design in my book.

I should at least get my money back, let alone my additional expenses to fix the tunnel, etc... but I'm not counting on it. :mad:


I would have to agree, the radius would not have stoped the tunnel from cracking. The design has failed to hold up the level that some of us require. I had to fix mine so I could ride the rest of the season. We should be offered a refund or credit for the product as we have cut up our stock assembilies and it would cost much more than that to return to stock or go the VE route. I still like the look of the BDX bumper and the function that it provides, However having the potential majior failure in the mountains of AK does not excite me. Hopefully if a fix is provided to us verses a refund it will look good and not like a patch or repair.

Jason
 
We are sorry to hear of the failures in the BDX bumper and we appreciate all the good ideas that our customers are coming up with to resolve the issue. Many of you see the importance of the correct install but we see there is also an issue for more bracing in the tunnel area for the more seasoned riders. We will have a kit that will be available in April for all bumpers purchased. It is a very clean and effective fix for this issue. We will advise our dealers and distributors once it is available. Thanks for your support and we will continue to support our customers.

Ray
 
Radius corner ... a 'WORLD' of difference?? Then how do you explain some or most of them are failing at the front bumper rivet.

Still a p*ss poor design in my book.

I should at least get my money back, let alone my additional expenses to fix the tunnel, etc... but I'm not counting on it. :mad:


The radius corner would help the fact of the tunnel cracking to a certain extent but it will still be weak and not hold up for a whole lot longer most likely it would instead of ripping the tunnel bend the ***t out of it it just does not have enough aluminum to hold the stress
 
We are sorry to hear of the failures in the BDX bumper and we appreciate all the good ideas that our customers are coming up with to resolve the issue. Many of you see the importance of the correct install but we see there is also an issue for more bracing in the tunnel area for the more seasoned riders. We will have a kit that will be available in April for all bumpers purchased. It is a very clean and effective fix for this issue. We will advise our dealers and distributors once it is available. Thanks for your support and we will continue to support our customers.

Ray

the true America..God Bless the honourable ...nice to see it still exists..
 
I couldn't emphasize more as Mountain Horse did, DEBURR all edges, but not knife edge, Just a .010 to .015 edge break all the way around including holes. I have been in the aircraft business for many years, And aluminumn will fatigue easily if not deburred properly. It is a stressriser waiting to happen especially on 1/16 thk. Yes you should put a radius cut at the end, But it will not cure the common cold. If you are to mount this for the first time I would mount the bumper ends into the dropbracket plate and try to tie it into the rear kick plate. Otherwise wait for the fix, Which should include an inner plate to rivet to into the rear drop bracket. This would sandwich the rear tunnel and triangulate the bumper into the rear dropbracket assy.


Good luck
Mike
 
Premium Features


Back
Top