Install the app
How to install the app on iOS

Follow along with the video below to see how to install our site as a web app on your home screen.

Note: This feature may not be available in some browsers.

  • Don't miss out on all the fun! Register on our forums to post and have added features! Membership levels include a FREE membership tier.

Installing an X3 track on my Pro RMK with chaincase (with pics)

tuneman

Well-known member
Lifetime Membership
I'm almost finished up installing an X3 track on my 2012 RMK Assault and thought I should post up some pics for anyone interested in doing the same to their sled. This sled has a chaincase. For 2013 and newer belt drive RMKs, obviously no chaincase mods necessary.

Out with the old 5.1 and in with the new X3. I picked up the track, drivers and anti-stab from Tracks USA. They had a smokin' deal going on last spring.
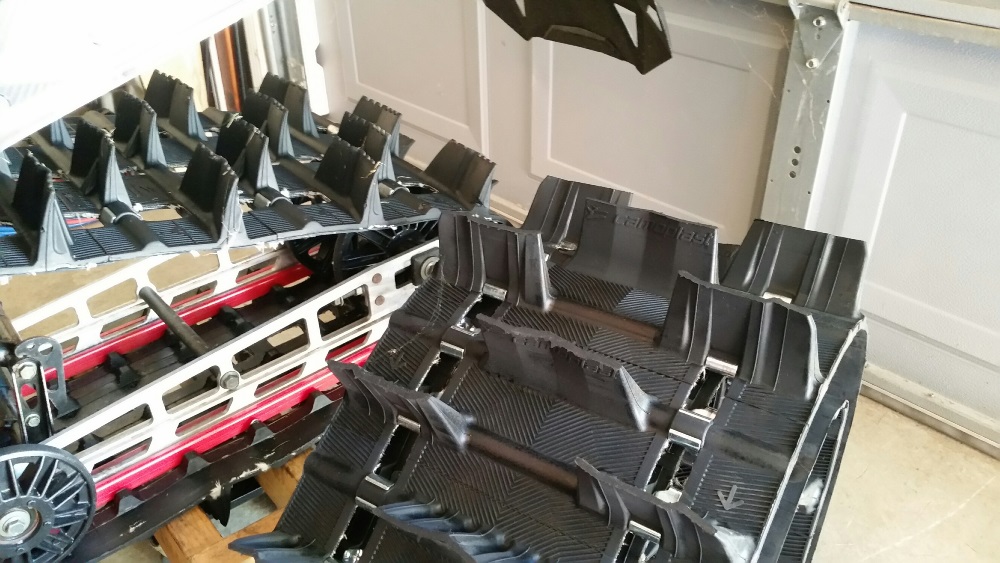
track_compare.jpg


Strippin' the sled down:
sled_pic_2.jpg


To get the clearance necessary, you can either do a drop and roll or just get 7 tooth Avid drivers(stock is 8). I chose extrovert drivers, since they essentially eliminate ratcheting and won't ice up like the involute(stock style) drivers sometimes do. Avid has a good writeup on their site on how to install these.
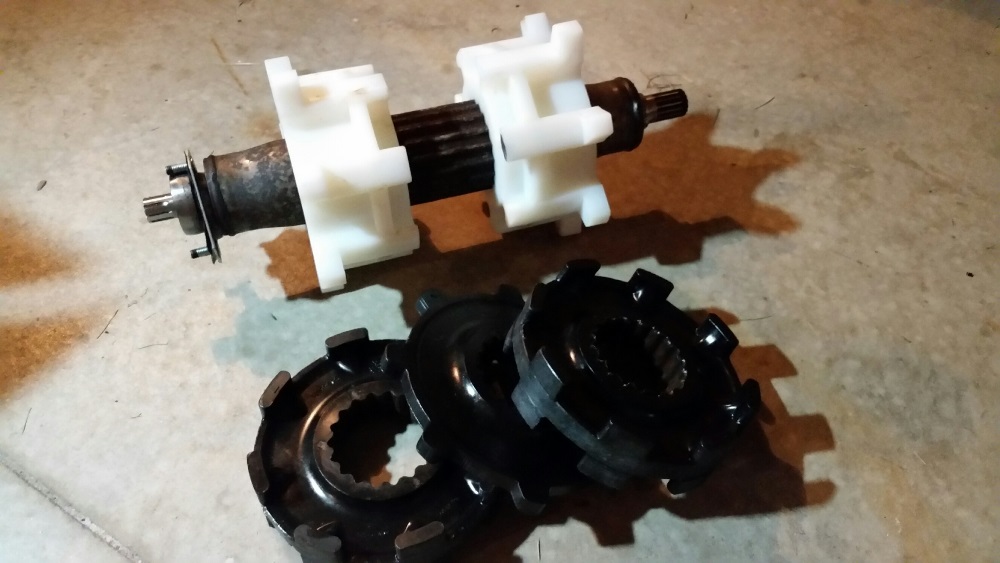
drivers.jpg


The chaincase is glued on 2012 and newer chaincase sleds. There's a good thread going on the Lords adhesive used. Essentially, you heat it up from inside the tunnel until the glue 'pops' free. Definitely glue back on, but don't use a regular epoxy, unless you don't ever want to get it off again. The Lords adhesive is specifically designed to come loose at a certain temperature.

Also, when removing the front torx bolt of the chaincase, heat it well or you run the risk of breaking it.

I had a local shop weld the case for me. Not the most beautiful welding job, but it'll work. I recommend leaving the bearings in the case as it's being welded so that the bearing pockets don't go oblong from the heat. Obviously replace the bearings and seals with new ones afterward.
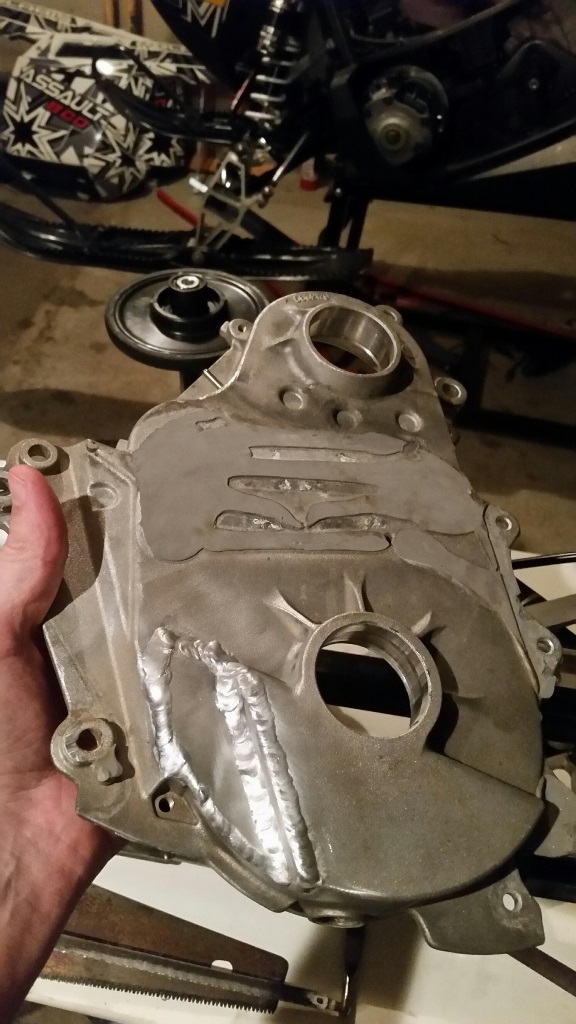
modded_chaincase.jpg


Ya gotta cut out the chunk shown in the pic. It's not an exact science, but basically cut from where the bolt flange ends on the bottom of the case, up to the half way mark of the bump out on top. Grind it flush and replace with a 1/8" plate or less. The new plate doesn't need to be flush with the back of the chaincase. It can bump out the plate thickness.
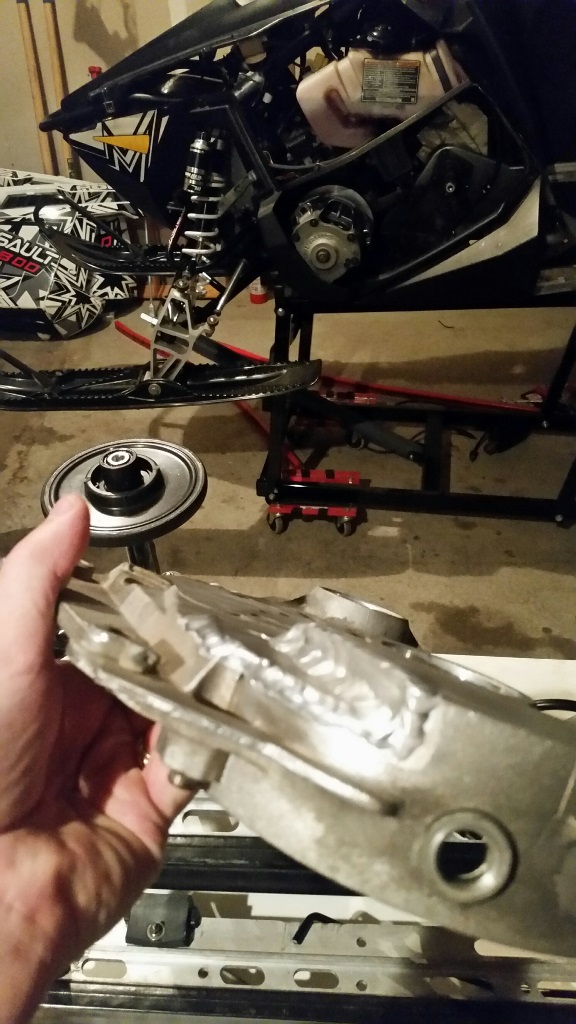
case_side.jpg


Pic with the chaincase reinstalled and drivers in. I highly recommend you put the drivers in BEFORE you reinstall the chaincase. By doing this, you eliminate the risk of dinging up your new drive shaft seal that you just installed on the back of the chaincase.
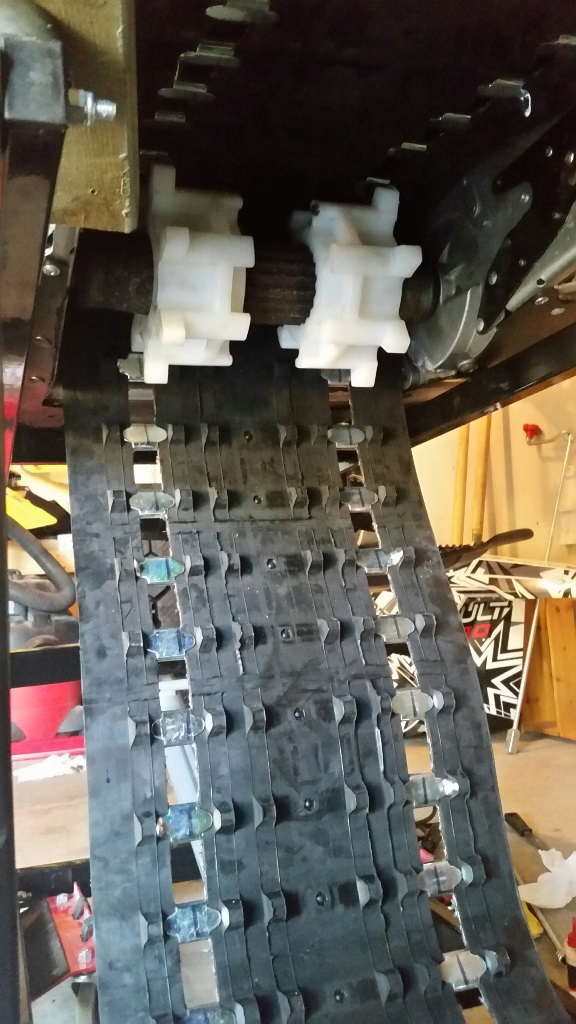
drivers_installed.jpg


With extrovert drivers, you gotta cut the tips of the rails off for clearance. But when you do this, you must install an anti-stab. Does something look bent to you?
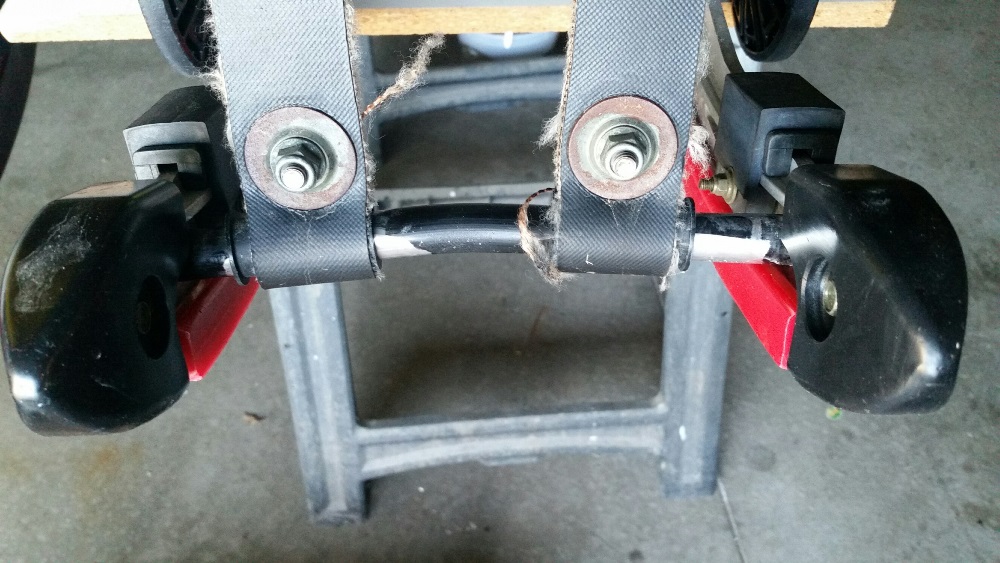
bent_bar.jpg


The anti-stab wheels mount where the old limiter strap bar was. I measured 3/4" from the axis of the antistab hole and cut away.
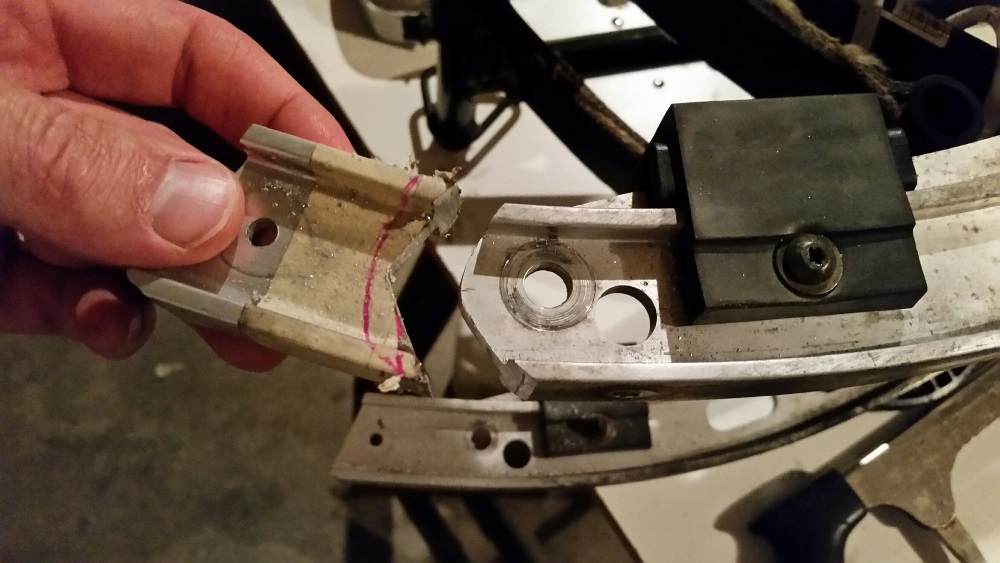
cut_rail.jpg


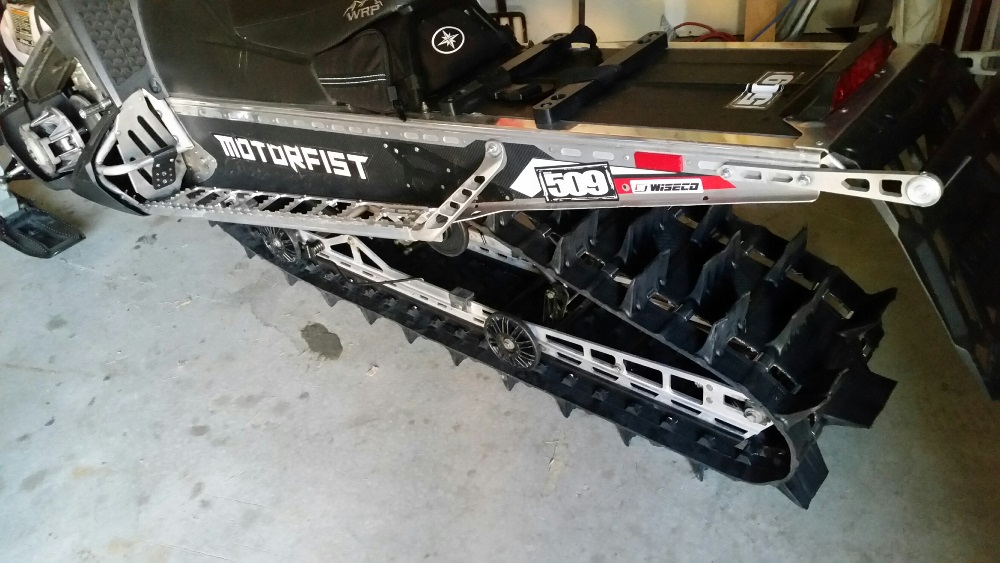
Then install the anti-stab. Trim the hyfax to fit and be sure to put a 45 degree chamfer on the front of the hyfax. I still need to trim one of the hyfax in this pic. If you have only one limiter strap, add another one.
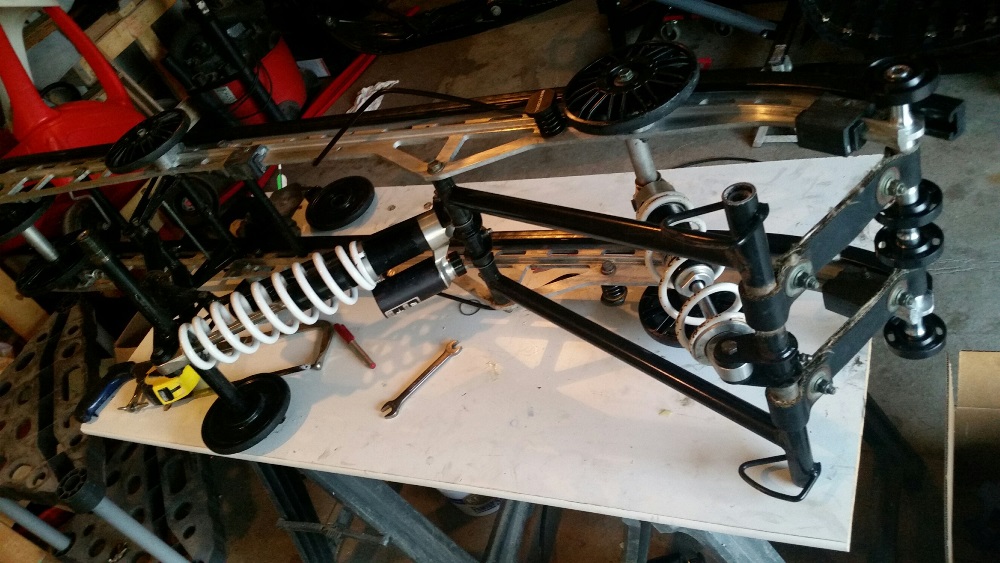
skid_out.jpg


Next up is cleaning and greasing the skid. I also put a 210# spring on the RTS. I wanted a 230# spring, but I got a good deal on the 210#. We'll see how it works.

Clutching is after that. Thinking of doing 62gm Belly Busters with stock spring in the primary, Black/Purple(160-240) spring in the secondary, with teflon washer and 60-42-36 helix. Let me know what you think about that setup.
 
Dropped the skid in last night, after going thru it and greasing it up. Found one seized bearing on an upper idler.

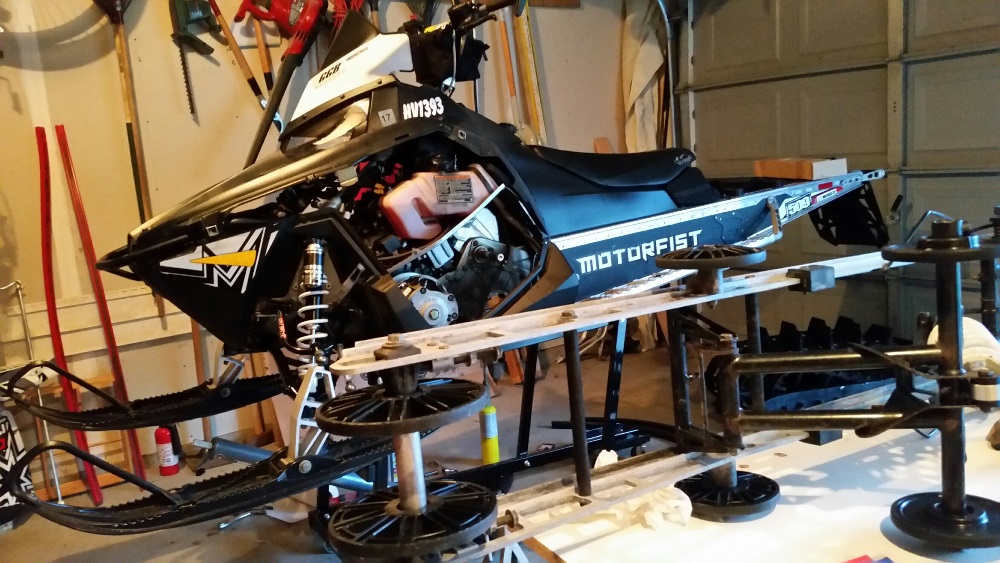
Just a word of advice when putting in, or taking out a skid: Always put the sled on the side and let gravity help you. Don't try to put a skid in with the sled on a stand. It's nearly impossible.

sled_03.jpg
 
Is the axys the same in that the rails need to be trimmed to run an X3 track?

Only if you buy extrovert drivers. Avid makes center drive drivers too. So you can get that, along with the center punched track. If you have a belt drive, this is all you would need for the setup:

Track: 156 x 15 x 3 Part# 9270MSE or 162 x 15 x 3 Part# 9220MSE

Drivers: 7 tooth x 3.0" pitch for Polaris center ported track
 
Your local welding shop needs a lot more practice on aluminum. That is just hideous! I've never laid down a bead that ugly, but If I ever did a weld that ugly, I could not / would not charge you for it.
 
Lol! Yeah, you can imagine my reaction when I picked it up. All excited and then.....oh......well.......I suppose that'll work........

It's a good weld, just not pretty. It's the last thing I'll be concerned about as I'm rippin' along the side of a mountain:-)
 
Ok, question for the X3 gurus. I went to tension the track and ran outta room. So, do I get 8" idlers or I've read a tiny bit of info about a Carl's recommendation of moving the front skid mounting hole back 3/4". Apparently, it helps trenching issues and takes up the space to allow proper tensioning of the track.

Is this still a good option or do I get bigger wheels? If I move the mount hole, does anything else need to be done to the skid to get full travel? Anybody done this? I'll call Carl's on Tuesday but hoping for a sooner answer.
 
Good write-up!

Stock track was a 155 I take it (since it was an Assault), what is the 3" track length? Wondering why you ran out of room to tension it up...

So if I were to decide to go 3", and ran involute style drivers, no antistab mod necessary. I see Avid sells those.

The icing-up problem with stock drivers, I had this happen for the first time last season in sticky snow conditions, on the Dragon (riding Dragons since 2009), and it was not the involute part of it that caused me and my buddy the problem it was that center driver and probably the lack of room between it and the involute drivers... that is where the ice built up, until it got high enough to interfere with the drivers. Some people cut the center driver out and experience no ratcheting. I might still do that. The old school sleds like my 99 700 RMK and 2003 ZX Doo never iced up and they all had the involute setup.

I noticed on the 2013 and newer Pros I looked at, that the center driver is narrower, which would give the snow less to cling to. They look like your center driver. Don't know if that helped a lot, but I can say my wife's 2013 Pro was not having the same problem my buddy and my Dragons were in the same snow conditions...
 
Ok, question for the X3 gurus. I went to tension the track and ran outta room. So, do I get 8" idlers or I've read a tiny bit of info about a Carl's recommendation of moving the front skid mounting hole back 3/4". Apparently, it helps trenching issues and takes up the space to allow proper tensioning of the track.

Is this still a good option or do I get bigger wheels? If I move the mount hole, does anything else need to be done to the skid to get full travel? Anybody done this? I'll call Carl's on Tuesday but hoping for a sooner answer.
If you have a 154" skid, get a longer adjusting bolt. You are running out of bolt and not the slot in your rails.
 
Guys, it's a 155" skid, but the X3 track is a 156". Mix that with smaller diameter 7 tooth drivers and I run out of room to tighten. Slots are not long enough.

Seems I have 3 options: 8" wheels, the Carl's mod or a 1" offset axel would probably do the trick. The 8" wheels might take up too much room, but not certain. I'm really most curious about this Carl's thing.

I gotta believe that everyone that put an X3 on a 155" had this issue, unless the Assault rails are more different than just the bend up front.
 
Ok, question for the X3 gurus. I went to tension the track and ran outta room. So, do I get 8" idlers or I've read a tiny bit of info about a Carl's recommendation of moving the front skid mounting hole back 3/4". Apparently, it helps trenching issues and takes up the space to allow proper tensioning of the track.

Is this still a good option or do I get bigger wheels? If I move the mount hole, does anything else need to be done to the skid to get full travel? Anybody done this? I'll call Carl's on Tuesday but hoping for a sooner answer.

8" idlers with the stock rear axle will help a little with the wheelieing that is inherent from the 3" track's massive bite. :)

I've ran 9" wheels with no ill effects in a stock skid (no offset axle)
 
Last edited:
Just a word of advice when putting in, or taking out a skid: Always put the sled on the side and let gravity help you. Don't try to put a skid in with the sled on a stand. It's nearly impossible

I've never put my sled on its side putting in a skid. (Did it that way one time with Austin) I use a chain hoist and lower the tunnel onto the skid on the floor. Easier to walk skid into track on floor than getting track around skid on its side IMHO
 
Last edited:
I've never put my sled on its side putting in a skid. (Did it that way one time with Austin) I use a chain hoist and lower the tunnel onto the skid on the floor. Easier to walk skid into track on floor than getting track around skid on its side IMHO
In the past I have used a jack on the rear bumper and lowered the sled onto the skid, and put a ratchet strap between the front and rear mount points to get them the right distance apart... the jack makes it easy to lower it a little at a time until things line up. I have always thought about putting it on its side but since I seem to be able to wrestle it in to place this way I didn't ever try it... guess I will get another chance when I swap out my stock track for a CamoEx 2.5... soon...
 
Small update. Robbie was correct, I did have more slot than bolt. Just enough. I had to move the jam nut to the other side of the bolt mount. I run out of slot when the bolts are about 1/8" from fully tight, but it's at the proper tension there.

No real room to tighten further, but fortunately these tracks aren't supposed to stretch. If I ever need more clearance, I could grind a bit of the plastic away, but I should be fine as is.

Now on to clutching. Anyone have a comment on what I'll be doing?:

Stock spring in primary (black 140/330)
62gm EPI Belly Busters

Black/Purple spring in secondary (160/240)
One delrin washer
60/42/36 helix

6-8k feet elevation
Hoping to pick up a helix and weights at Haydays this weekend. I've got the rest.
 
Another quick update: I did finally contact Kyle at Carl's Cycle. He knows his stuff, when it comes to the X3 on an RMK. So, their clutch kit, minus weights (already have the Belly Busters), is coming. They're also sending me a custom 230lb rear track shock spring and a 150lb stock RMK front track spring. My Assault comes stock with a 180 pounder up front.

Kyle also emailed me instructions on how to move the skid back for better transfer/less trenching. It's a very simple mod and I'll post pics when I do it.

In summary, if you're gonna put on an X3, just call Carl's and have them set you up.
 
While I'm waiting for my springs and clutch parts to get delivered, I've started the Carl's X3 skid relocation mod. This will hopefully give me more track tension adjustment and reduce trenching.

First thing to do is to move the front skid mounts straight back 3/4". There is a pilot hole for this already on the reinforcement plate inside the tunnel. This pic is of my right side Assault reinforcement plate. The Pro RMK plate looks a bit different, but the pilot hole is still there. I've got an extra lower hole, which is the original Assault mount location.
mod1.jpg


Drill out here with a 25/64" drill bit. A 3/8" bit will also work, with a bit of round filing.
mod2.jpg


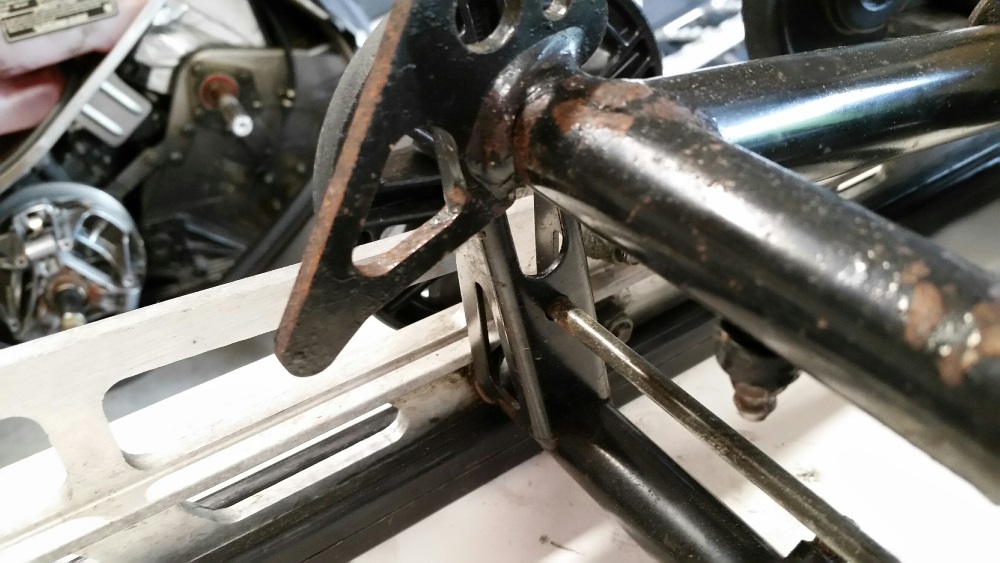
Now, you're probably thinking, "Don't I need to move the rear mount too?" According to Carl's, this is what you do instead: Locate the triangle stop on the lower section of the rear torque arm.
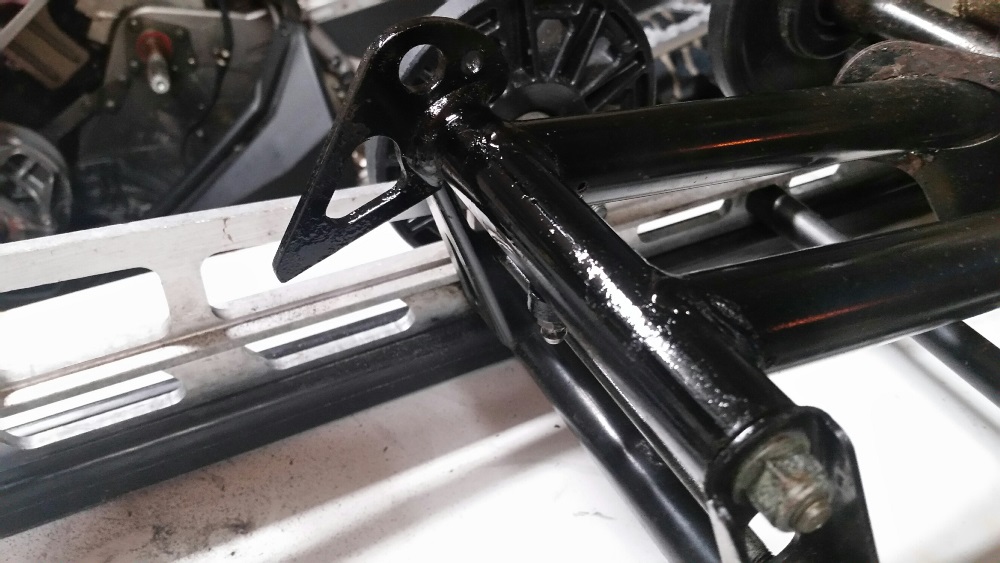
mod3.jpg


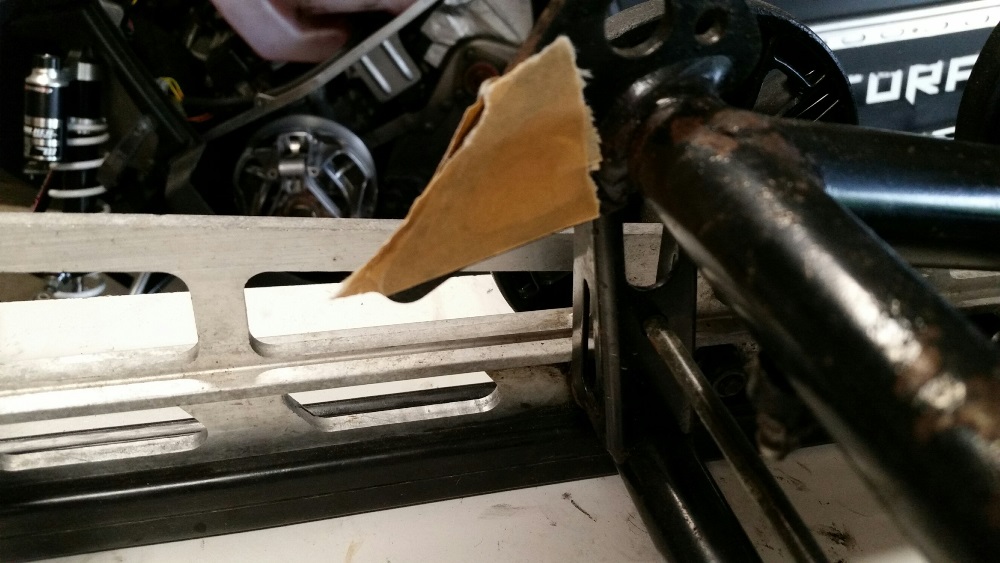
Trim away the bump out of the triangle.
mod4.jpg


With the bump removed, the skid will now have its full travel back.
mod5.jpg
Can this mod be done to a stock sled? I'am thinking on swap out my old 5.1 track with a series 6 track on my 13 pro rmk, and i'am thinking on go with 8t drivers
 
Good question. It could be done, but it may have a negative effect with the 2.6" track. This mod moves the transfer back to keep the front down for the 3". I don't think you'd have the same issue with the Series 6 and may make the front feel heavy. Call Carl's Cycle to see if they've done it.

BTW, a series 6 track will fit your sled with the stock 8 tooth drivers. It's tight, but it'll fit (everybody get your minds out of the gutter...). Try the track only first and mod the skid later, if needed.
 
Premium Features


Back
Top