Install the app
How to install the app on iOS

Follow along with the video below to see how to install our site as a web app on your home screen.

Note: This feature may not be available in some browsers.

  • Don't miss out on all the fun! Register on our forums to post and have added features! Membership levels include a FREE membership tier.

Camso DTS 129 install-what is involved/degree of difficulty?

Temps

Ben, reference the temps. Even with a thermostat, maintaining temps in the deep is a challange. The warm engine coolant moves up into the cold radiators and cold coolant moves down to cool the engine via the unrestricted lower rad hoses. This happens via thermal convection even if there is no coolant moving past the thermostat. Old radiator type residential hot water heating systems functioned without pumps on this principle. So, keeping those rads warm is helpfully. That requires some sort of cover or restriction that limits bathing everything in that powder. In addition to a thermostat and engine blanket, I've used plastic piece that hinged near the bottom of rads that I pulled up over the rads with a small wire and held in place with a hook. I've also used a canvas attached at the top of rads and had a draw string at bottom which allowed lifting the canvas in increments depending on conditions. Both worked to maintain temps much more consistently. A small hassle to adjust while riding but, I believe temp control is paramount for reliability and longevity. Best of luck
 
Ben, reference the temps. Even with a thermostat, maintaining temps in the deep is a challange. The warm engine coolant moves up into the cold radiators and cold coolant moves down to cool the engine via the unrestricted lower rad hoses. This happens via thermal convection even if there is no coolant moving past the thermostat. Old radiator type residential hot water heating systems functioned without pumps on this principle. So, keeping those rads warm is helpfully. That requires some sort of cover or restriction that limits bathing everything in that powder. In addition to a thermostat and engine blanket, I've used plastic piece that hinged near the bottom of rads that I pulled up over the rads with a small wire and held in place with a hook. I've also used a canvas attached at the top of rads and had a draw string at bottom which allowed lifting the canvas in increments depending on conditions. Both worked to maintain temps much more consistently. A small hassle to adjust while riding but, I believe temp control is paramount for reliability and longevity. Best of luck

Thanks so much.

I'm glad that my bike has a temp gauge with the TrailTech Voyager that came stock, already installed on the bike and I will make sure to just leave it on the engine temp screen once I start riding.

I'm going to start with a PST engine cover and make some covers to block out the front of the radiators and see how the engine temps go with that as my starboard-side radiator does have a fan on it that triggers at about 215 F and I've never seen the temp go past 224 F.
 
Curious where you guys are getting that fine filter mesh material?

I am taking my whole air box off and building a coolant powered carb intake heater with an integrated extension to act as a snow filter. I figure it should work with ~2" ABS pipe, drilled out and wrapped with some kind of snow inhibiting breathable fabric?

What material could I use for this screen so that I can cut and wrap it to a custom size?

Misha subo, I've used a material I located in a fabric department. It is a black shear nylon material that looks near identical to the skinz type water repellant prefilter material. I would recommend the water repellent stuff for your intake cage. But for sealing off all the places snow can get in I've used the nylon fabric material and two sided tape with great results. It is really cheap compared to the name brand water repellent treated stuff. I think it was less than 4$ for a yard of the material. I think it's used as a lining in a dress by seamstresses. It was in Walmart last I looked. If you want to pierce it for securement just heat a nail and push in. It's pretty tough and holds up while filtering out snow.
 
I have been looking at camso's web page and don't see a list for the dts fit kit for dirtbikes when I select honda and year it only shows sxs's and atv's. I've tried other makes and years same result anyone know how too find there fit kit list
 
Curious where you guys are getting that fine filter mesh material?

I am taking my whole air box off and building a coolant powered carb intake heater with an integrated extension to act as a snow filter. I figure it should work with ~2" ABS pipe, drilled out and wrapped with some kind of snow inhibiting breathable fabric?

What material could I use for this screen so that I can cut and wrap it to a custom size?

For some reason, the Canadian distributors don't stock the frog skins brand of bulk pre filter. The good news is that slp makes it, and it is available from a dealer. Can't remember if the distributor was motovan or parts Canada or Kimpex etc. It was around $60 for a 24"x24" sheet.
 
The crate/box is on my trailer, behind my truck, in my work parking lot right now. I'll get the crate into the garage tonight with the wife's help, uncrate and get the parts into the basement. Pics to follow.

After having read the install, adjustments and users manual last night, the install does not look too difficult at all-phew. I'm actually looking forward to it in the upcoming days.

It is going to be a fun winter.
 
Last edited:
It's a good time when your anticipating the install. Me and my son will install ours in a week or so, when he gets out from school for the break. Hope to squeeze in one more ride before the ground freezes though? Running Tubliss now and man does that renew your smile in the dirt! Tubliss is the biggest advancement in dirt biking in the last decade. If you haven't tried it imagine traction at 1-2 psi (not to high jack this thread).

Back to the topic at hand. It would be helpful if you take stage-wise photos. After un-boxing, I have noticed a broken nylatron bushing on one of my kits. It's that black nylon, CNC cut round slider that goes around the left side swing arm mounting point. Perhaps the kit shifted in the crate and pushed against the inside of the box? At any rate, the crack is in a relatively superficial place which should not stop things from working.

No problem with any sort of hijack, I don't care at all about stuff like that. I welcome any and all information/posts. I'm all about the first amendment-ha!

No, I have not tried tubliss and don't even really know about it other than one can run low psi and not worry about flats. I never have much of a a problem with traction, even with the 10-15 psi I run as I think my 477.5 cc 4T motor compensates for any lack of traction with brute power-all in my mind, maybe, but I also don't want to deal with the system every time I swap tires as I go through a Pirelli Scorpion Pro DOT 140/80 18 every 7-800 miles so . . .

I will be doing a sort of step by step with pics for sure.
 
Tubliss can't beat the traction of a 129" track on summer trails. Haha.

Are you guys concerned at all about Camso's verbiage in their warranty stating that the kit is supposed to be installed by an authorized dealer? Have you talked to your dealer or Camso to clarify? I'm about to pull the trigger on a new one -- I ran a Timbersled for 5 seasons and always did the work myself, so I know it shouldn't be a problem. But I wouldn't want to do anything to mess up the 2-year warranty.

The do make it very clear in the warranty section that the install has to be done by an "Authorized . . . ".

As I have faith in my installation skills, I am willing to bet the $700 or so that my dealer wanted to charge me, that is they had quoted me 7-9 hours of labor at $89 per hour. I'm willing to roll the dice and if something breaks, I'll pay to fix it and at the same time, see if Camso might be willing to help with anything.

In all the threads/reviews, I have not come across one where someone had broken anything and broken stuff-that I managed to break- wouldn't be covered anyway.
 
Tubliss can't beat the traction of a 129" track on summer trails. Haha.

Are you guys concerned at all about Camso's verbiage in their warranty stating that the kit is supposed to be installed by an authorized dealer? Have you talked to your dealer or Camso to clarify? I'm about to pull the trigger on a new one -- I ran a Timbersled for 5 seasons and always did the work myself, so I know it shouldn't be a problem. But I wouldn't want to do anything to mess up the 2-year warranty.

No, that's just it...the Tubliss actually has better traction in the summer than the 129 track is in winter!!!! However, I'm going to keep quiet on this from now on as it will create more competition at enduros if more riders go Tubliss...2 psi...it's like cheating. :face-icon-small-win

Back to snow bikes...I contacted the Camso office and spoke to Stefane...a very helpful guy I met at the Toronto snowmobile show in October. He has assured me that if we get our dealer to do a quick "once over" inspection after our self install, Camso will still honour warranty. The main thing is they are understandably concerned about strut height and track tension at initial set up.

That is awesome about the warranty, even if I had to pay the dealership to check it all out. I still think I'll be totally lazy and not even bother and take the chance that nothing is going to go wrong-warranty wise, anyway.

I'm going to make sure I get the strut height, the track, AND chain tension correct for sure.
 
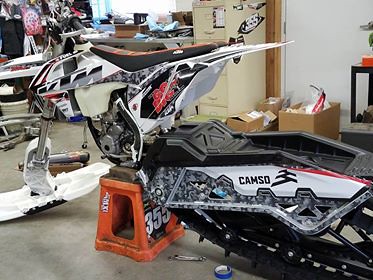
These kits are nice and offer a clean install with good directions.

26830831389_98688df5c4.jpg
 
I'm starting and doing what I can today/tonight. It is actually not going to be too hard at all.

The hardest part will be tearing down the bike-but even this is not going to be too bad- as I got my bike new this past February, and put 2,000 miles/200 hours on it, I expect that everything will come off pretty easily.

P1130161.jpg
 
Last edited:
Here was one snafu;

The online install manual for my bike had shown that one was to use position #2 for the rubber spacer stack on the bottom of the strut rod. The problem is that the same numbered install manual that came with my bike wanted position #1.

I had used the #2 position only to find out that #1 is correct. Camso customer service was no help at all.

Helpful tip-that I didn't realize right away, was/is, to use a long socket extension to either tighten or loosen the bottom strut bolt and go at it through the center track window, just maneuver the track so the socket has a clear/straight shot at the bolt.
 
Premium Features


Back
Top