Install the app
How to install the app on iOS

Follow along with the video below to see how to install our site as a web app on your home screen.

Note: This feature may not be available in some browsers.

  • Don't miss out on all the fun! Register on our forums to post and have added features! Membership levels include a FREE membership tier.

TSS bushings

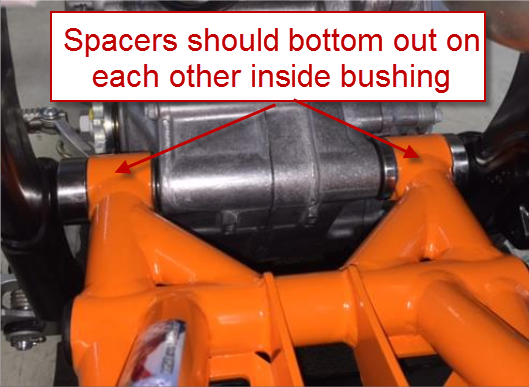
I installed my kit the other night. I noticed that when the swing arm bolt gets tightened it feels very spongy. I feel like I'm crushing the o-rings instead of bottoming out on the fit kit spacers.

Has anyone else experienced this?

I feel like it should have been designed to have all of the spacers bottom out on each other, allowing the o-ring to compress slightly against the bushing. I'm going to take mine apart again and measure everything to see how the parts stack up. If my assumptions are correct I will find some shim washers to put between the spacers.
 
Not a bad idea, I heard people found the bushings were a poor fit on their particular application, so they made their own.
It would be really hard to get to their specified torque settings if it is spongy though.
 
I couldn't get mine to fit no matter how hard I tried to smash the o-rings into place. I beat on the kit and put clamps on them to try to get the o-rings to compress enough... no dice. Pulled the rings out and even then it was a very tight fit.
 
I'm installing this on a KX500 and if just doesn't feel right. Here is a quick illustration to better show what should be happening.

Timbersled%20TSS%20bushing.png


Additionally, a friend of mine is installing the new TSS kit onto his '13 KTM 450 and only got 3 spacers with his fit kit. This means that the o-rings only seal off one side while the other is exposed. I wonder how quickly the grease will wash out of the left pivot point. Mine came with 4 bushings and o-rings to completely seal off the pivots. Unfortunately the o-rings probably won't last in their current state.
 
I couldn't get mine to fit no matter how hard I tried to smash the o-rings into place. I beat on the kit and put clamps on them to try to get the o-rings to compress enough... no dice. Pulled the rings out and even then it was a very tight fit.

Mine was also very difficult to fit. I ended up loosening all of the engine mounts to help align everything. Even then I still had to Clamp the spacers to compress the o-rings enough.
 
Had the same problem on my KX 450 had to machine one steel bushing 12 thou to make it fit, even with no O ring it didn't fit, but the last 5 kits I have had All needed some massaging in that area, not sure all bikes are the same? Had 2 2011 KX 450 and the kit was not interchangleble bike to bike!
 
Yes, every bike is a little bit different. Realize that over time the frames will flex and fatigue slightly. I would advise keeping the oring in there. I just installed an RMZ450 kit Saturday that would NOT go in and I had to turn down about .003" on each side spacer for a snug fit with the o rings in there......but the frame was powdercoated as well.
 
I had a hell of a time squeezing my TS TSS into the frame of my KTM500... But with the right muscle and wiggling it finally just popped into place, next hardest thing was angling it in the frame to get my masterlink back on. Everything was extremely tight, but I suppose tight is right :face-icon-small-coo
 
http://www.snowest.com/forum/showthread.php?t=402063

Check out my thread. I honed the inside of the frame with a flapper wheel for a good 15 minutes each side. After that I was able to push the plastic bushing in with a slight tap. I then used the 7/8 drill bit and honed the plastic bushing. After that the metal bushing just slid in by hand.

Saw that thread earlier good info and pics. The manifestation of snowbike culture is still pretty new, the tweaking, honing, cutting, sanding, adding taking away, and McGivering things is all part of it. The guys who are innovators and mechanically inclined are always inspirational to those who need a hand or just share ideas.
 
i've got a 2015 kit and a 2015 KTM 450SXF. It was a HELLA tight fit getting the kit to slide in between the frame and the bushings. I used a dead blow hammer and a 2x2 for persuasion. With some wacking and wiggling, it popped in without too much issue. i agree though on the O-ring issue. Mine only has three metal spacers/bushings. So one side won't be totally sealed. It was tight so it should be pretty good though!
 
Last edited:
i've got a 2015 kit and a 2015 KTM 450SXF. It was a HELLA tight fit getting the kit to slide in between the frame and the bushings. I used a dead blow hammer and a 2x2 for persuasion. With some wacking and wiggling, it popped in without too much issue. i agree though on the O-ring issue. Mine only has three metal spacers/bushings. So one side won't be totally sealed. It was tight so it should be pretty good though!

I'm probably going to grind some off my outer bushings, I expanded the frame about a mm or 2. I think it is expanded a mm as it sits in place. I used a crankcase puller to spread the frame slightly. Probably not a good idea, but it got in there, and chain is aligned. It is seriously sandwiched in.
 
I haven't gotten a chance to take my KX500 kit apart yet but the KTM 450 spacers measure to about 0.5mm larger than the stock swing arm spacing which isn't bad at all. This would lead me to believe that the spacers will bottom out on each other as they should. I just really don't like how spongy the swing arm bolt feels while tightening it to it's torque setting. It is probably just the O rings getting compressed. (Possibly over compressed) I would try to get a caliper on the plastic bushing inside the Timbersled kit but pressing it back out doesn't seem like a great idea right now.

On another note, the new '16 kits rock. Definite increase in traction with the new track in deep snow and the TSS really sucks up the bumps on rutted up trails. I'm not sure if the TSS helps at all in deeper snow but it doesn't seem to hurt it at all. It is definitely a step in the right direction to get you that dirt bike feel on snow.
 
Premium Features


Back
Top